Tuesday, August 31, 2010

The Bird!


Glenda Stockwell walks through the process of making "The Bird".


Warning: Don't read this blog post if you are offended by seeing "the bird".


I got a call from a friend wanting to celebrate her divorce and I had no idea of what I was going to create. I had seen several ideas before but just wasn't overly thrilled with creating any I had seen before. She showed up to chat about ideas with a collection of invites and other divorce cakes that she found on the web. One in particular caught my eye and the idea for the cake was born:


I called Melissa to see if it would be possible to make a "bird" mold. She mentioned a product that would set quicker and was used for molding body parts. After a run to the store and directions from the sales rep Melissa and I met up to make the mold.


The directions suggested starting with a small body part such as a thumb. So, we mixed up a small batch and in went Melissa's finger. A short time later (much less than the 10 minutes mentioned in the directions) out came Melissa's finger. We chopped the mold in half to inspect the cavity.


Not bad. Looks like a finger to me.


Now came lots of giggling on exactly which of us could hold our hand in the best "bird" pose. Shocking but I won. Not like I over use my middle finger or anything.


I was wondering I would get a hand cramp holding the pose for 5+ minutes. Nope. I was kinda squishing my fingers together worried that mold material would go in between finger spaces and such making it difficult to mold in chocolate later. I even wiggled a bit and worried I had ruined the mold.


After about 6-7 minutes I could feel the mold kinda pull away from my hand. At this point we wondered how we are going to get my fist out of a hole the size of my wrist -- yeah you would think we would have thought of that sooner. Melissa picks up the container and we are ready to pull like crazy when out pops my hand! Easy peasy.


Looking down in the mold we had no idea if it was good. Sorry but I didn't get a shot of that. We immediately filled the cavity with silicon mold material and stuck a dowel in to make a handle. We filled it with the silicon because the initial mold material has a short life -- it begins to break down in 4 hours.


About six hours later I get this photo in a text message:


One silicon hand! Not bad. Melissa then used a brush on silicon to make a glove over the hand. After that set we peeled the glove off. Melissa made me two since I would have to cut the glove off to avoid breaking the fingers.

I placed the glove in a large cup and filled around the mold with flour to hold it up and give support so it wouldn't turn into a big fat squishy hand. I then filled the glove mold with white chocolate colored with ivory food coloring and stuck in a skewer. Into the fridge it goes....where it sat for half a day because I was too chicken to take it out. I pulled the hand out of the flour and cut the glove away.....to find a very squished and deformed middle finger. The weight of the hand squished it all down!

So, I molded a second one. This time I wrapped the middle finger up with masking tape to make it stable. Stuck it down in flour, filled the mold and stuck it in the fridge while I went back to work. I got home that night and I cut the glove away. Looked good. There were a few air bubble holes and two missing finger. I filled in most of the air bubbles. For the missing fingers I re-molded the middle finger twice - chopped them off in the appropriate spots and attached. It was kinda creepy chopping off what basically looked like my own finger. At least it didn't bleed.

I then just stuck the skewer into the cake. I used a little luster dust/everclear to paint the nails. If only I had better fingernails it would look better. The ring is gumpaste with an isomalt gem.


Here is a shot of the palm. I wish I had taken a better pic of this side so you could see where I had to do repairs -- trust me though it was difficult to tell unless you got up close.


If you have any questions feel free to ask.


I'm trying to talk Melissa into making different hand molds to sell on her site. These would be LARGE molds and probably a custom type mold. If you have suggestions for hand positions -- peace sign, fist, sign language "I love you", fist of rock, etc -- leave a comment and I will see what I can talk her into.


Enjoy
Glenda

Tuesday, August 24, 2010

Giant Gerber Daisy

Tracy Gamblin created a beautiful cake using the giant gerber daisy mold as the focal point.

I knew when I saw the Giant Gerber Daisy mold that I wanted to use it against a dark chocolate fondant. I even had it in my mind that I would have lots of little Gerber daisies surrounding it on top of the cake. Funny how things work out when you start decorating and realizing there may be a change in plans.

First, the Giant Gerber Daisy was big…very big. I used a small bit of white gumpaste/fondant as the center. Then I added pink gumpaste/fondant on top of the white for the petals. I was careful not to add too much gumpaste/fondant to the mold because I was concerned about too much thickness thus adding more weight to the flower. I also did this same process for the small blossom set mold that had little daisies in it.

It worked out great and after removing the flowers carefully I allowed all of them to air dry for two days.

I wanted to give the giant daisy (and the smaller ones) more depth by painting them with the following dusts: plum, then mauve for the petals and apple green and avocado for the centers. I highly recommend using dusts as it gave the giant daisy so much more depth.


I decided to use the Feather Swirls #2 Texture Mat to make impressions all over the dark chocolate fondant that I rolled out to cover the cake. The result was so subtle and very nice compliment to the dark color of the fondant. I attached a 1 ½” size bronze colored ribbon around the bottom for added contrast.

I realized at this point the Giant Gerber Daisy was going to be the focal point and adding all the small daisies to the cake was not the right approach. I decided attach the giant daisy in the front (with some green leaves I cut out from my own collection) and laid the smaller daisies on the cake stand around the cake.


I hope you enjoy the project. I still can’t get over how large the mold is for the Giant Gerber Daisy and I’m looking forward to more possibilities for using it.

Products Used:

Giant Gerber Daisy

Mini - Blossom Set A

Feather Swirls #2 Texture Mat

Monday, August 23, 2010

A Beautiful Gift


Maria Short created a beautiful package cake using one of our package bow molds.

Aloha,

This a simple gift box cake using the package bow mold. The bow is made from gumpaste and everything else is tylose strengthened rolled fondant.

Mahalo,
Maria Short
www.shortnsweet.biz

Bow Loop Molds:
Grosgrain Bow Loop
Hearts Bow Loop
Plain Bow Loop
Polka Dot Bow Loop
Vine Bow Loop Large
Vine Bow Loop X-Large

Wednesday, August 18, 2010

Alstroemeria

Yael Miller created an alstroemeria using our veiner and decorated the vase with the trebow brooch.


Products Used:

Similar Products:

Tuesday, August 10, 2010

Pretty in Pink

Glenda Stockwell created a stargazer lily using our veiners,stamen molds and cutters.


Using the multi stamen mold I created the stamen bundle in the middle of the flower. First was the tri-lobed cavity for the center - this is added to the end of a gumpaste covered wire. Then the long slender cavity for the outside stamens. These were allowed to dry overnight before taping the wires together.

Next I cut 3 large and 3 small petals using the stargazer lily cutters. I softened the edges with a ball tool then used the stargazer lily veiner to get some details. The petals were draped over some foil to set up slightly. When they were able to hold their shape I assembled the flower. I took a plastic cup and covered it in foil. Lay the smaller petals down evenly spaced using a touch of gum glue to get them to stick together. Position the larger petals between the smaller - again using gum glue. Poke the wire for the center bundle down into the center. Using cotton lift and position the petals to give a more natural position.

Once fully dry use petal dust to color the flower.

Saturday, August 7, 2010

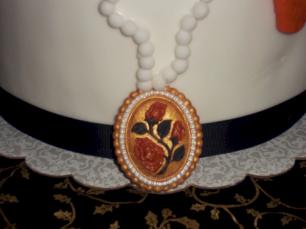
Rose Cameo

Tracy Gamblin created a beautiful cake using the rose cameo mold.

I knew the minute I saw the rose cameo mold what I was going to do with it. I wanted to make a necklace and show a rose spray around it.

I used 50/50 gumpaste and fondant in which I lightly tinted it with Wilton copper. I made up several cameos because of painting issues (always nice to have some spares). Here is a picture of the process of painting.


I’m painting the roses with Global Sugar Art poppy red dust mixed with clear vanilla. The leaves/stem were done in CK Forest Green dust/clear vanilla mixture.

Next I painted the outside with CK Aztec gold dust/clear vanilla mixture. The pearl part was done the same way with Wilton pearl dust/clear vanilla. I allowed the cameos to dry for a couple of days and then I assembled the “dummy cake”. I made the rose and white filler flowers spray a while ago and thought they would be perfect for the necklace. I did use a chantilly lace textured mat from Studio by Sculpey on red fondant. This gave me the look of a piece of red fabric to drape the pearl necklace over.

The pearls are size 8mm from a CK mold that I have. I tried the 12mm but the pearls were way too large and took the focus away from the cameo piece.

I really enjoyed the experience and I hope you like the finished product.

…..Tracy Gamblin

Product Used:


Friday, August 6, 2010

First Communion

Rebecca Stewart created a beautiful communion cake using the pearl jeweled cross mold.

This small 2 layer cake was the top cake for a First Communion cupcake tree. The cross topper was molded of white chocolate coating using the Pearl Jeweled Cross mold. Once removed from the mold, the cross was dusted with pearl dust. A lollipop stick was attached to the back with melted white chocolate coating to allow the cross to stand upright on the top of the cake amidst the flower spray.

Rebecca

Product Used:

Thursday, August 5, 2010

Defy Gravity

There was a request to explain how the floating collar works.

The first step is to make your collar. You can use many different mediums -- gumpaste, fondant, pastillage, color flow, royal icing -- just choose one you like. For the project shown I used fondant mixed with some tylose to get it to dry quickly. Leave the collar on a flat surface until completely dry and hard.

Once you are able to handle the piece prop it up above the cake. You can use many different items to prop the collar - I like to use makeup sponges that I have cut in half. You can see the sponges placed around the collar to hold it above the cake.

Mix up a batch of royal -- I typically do this with a fresh egg white and slowly add powdered sugar to get the consistency that works for me. I also add a pinch of gum trag and a drop of glucose.
I run the royal icing through a bit of hosiery to ensure there are no lumps that will clog in the tip. Place a tablespoon or two into a small piping bag with a small round tip (I think I used a PME 0). Start the string on the collar and gently squeeze the bag drawing your string to the top of the cake. Continue making strings around the collar skipping the spaces where sponges are located.


Once the strings are dry -- my first string will be dry well before I got all round the cake. Simply remove the sponges and fill in the gaps. Some designs leave the gaps open. Be creative!


I hope these directions help. Feel free to ask questions. Send me pics of your collars - I would love to see them!

Original post with finished cake: Click here

Glenda

Product Used:
Trim-Braided: Lace Piece

Monday, August 2, 2010

Tear Drop Lace


The tear drop lace border mold was used to create this shower cake. Simply dusted with some pearl dust the lace make a wonderful accent on the cake. The full mold was used for the lace at the top and then cut in half lengthwise for the bottom border.

Product Used:

Saturday, July 31, 2010

Beautiful Lace

Mindy Shay played with a new lace mold.

Hi, my name is Missy and I have a cake blog where I tell all about my experiences in baking and decorating cakes. Missyscakesandaprons.blogspot.com I was asked to test out a product and I picked the Lace - Double Flower Center Mold. I had never used a lace mold before and I was very excited to try it out.

I’m sorry about the glare, I like to do my fondant work on my cutting board and the flash made a terrible glare!

First I dusted my mold with a little powdered sugar. Then I took a mixture of chocolate fondant mixed with modeling chocolate and rolled a log and “smooshed” it into the mold. I put too much fondant into the mold and had to “cut” some of it out. It was too hot in my kitchen to be using modeling chocolate so the impressions did not turn out as well as I would have liked.


Be sure to put powdered sugar on your board to prevent sticking. Doesn’t it look great with this dark brown? It tasted yummy too!

I made a small cake for church so that I could test these molds out.

The best part is how easily it molded onto the round curve of the cake and was very quick and easy to make. Wouldn’t this also look great as wings on a bat or bird? Just make the middle part a bird or something and you have a double use for this mold!

Next I tried out just straight fondant, I used green so you could see the fondant in the mold. I tried rolling the fondant onto the mold, but that didn’t work out very well.


(Yes, I know that my apron looks like a hospital gown here, but I promise that I am not crazy!)
Next I used an angled spatula cut excess fondant out.

It was very easy to just place the lace onto the buttercream, if my cake had been covered in fondant, I would have used either water or vanilla extract to adhere the fondant.

I tried a different approach on my third lace mold. I tried using even less fondant.

First I took the fondant and flattened it out in the basic shape of the mold in my hands.

Then I “smooshed” the fondant into all the crevices of the mold.

I then took my roller and rolled the fondant smoothly into the mold.

I used my spatula to take away any extra fondant.

The fondant peels out of the mold very easily.

I then trimmed off any extra fondant again after removing it from the mold. I centered the lace where I wanted it to go and pressed it gently onto the cake. This lace turned out the best. I had used less fondant on this one and I was able to get every detail to show. I LOVE this mold.

You can also make impressions onto fondant to cover the cake. I rolled my fondant out onto the board.

I then gently pressed the mold onto the fondant. Do not use your roller, it distorted the image.

My picture of the good impression did not turn out, but you can see what a pretty design it makes here.


This mold would be great for any kind of fancy cake, and it is big enough to use on big cakes or as the entire design on a small cake.

Product Used:

Friday, July 30, 2010

A Beautiful Cameo

Rebecca Stewart created a beautiful bell cake using a cameo mold.


The setting and “Sisters” cameo were molded from gumpaste and allowed to dry. After drying the setting was dusted with Inca Gold. The cameo was flooded with Black Magic petal dust in an Everclear suspension. I used my airbrush to blow a stream of air to aid in drying. After drying, the cameo was lightly buffed with a soft towel to remove a little more color from the raised surfaces. It was then dusted with Super Pearl (I used my large, fluffy brush that is only used for Super Pearl, and did not add any dust to the brush).

The two pieces were attached with a thin layer of gumpaste and gum glue and steamed.

The bell shaped cake was covered in flesh toned fondant. A choker ribbon was cut from fondant and dusted with Black Magic petal dust. (I just covered a pan for this project.)

Rebecca is a full time school library director with a passion for cake decorating. She has been decorating seriously for the last 5 years, when she discovered gumpaste and fondant, and as a hobbyist for over 30 years. She has albums of her cakes on both Flickr and Facebook.

Products Used:

Cameo-Sisters mold

Cameo Setting #1 mold

Thursday, July 29, 2010

Sandy's Anniversary!

Sandy Swart created a beautiful anniversary cake using the square medallion mold.


This weekend was our 29th wedding anniversary. Just hubby and me and we’re tired of cake. LOL Here’s a token anniversary cake for DH using left over calla lilies from two wedding cakes this past month, two 6” layers baked with leftover batter, and cornflower blue buttercream leftover from the beer cooler cake done this past weekend. I have wedding cake coming up with drapes (that I haven’t done in a long time so decided to play around. Made fondant drape with moirĂ© texture to wrap around base of cake. Make a butterfly bow and instead of a knot I used Melissa’s square medallion mold and just molded a corner of it in fondant. Painted it with luster dust/everclear and used it for the bow knot. I really like the way that part came out. Just goes to show, you have to think smaller instead of always using the entire mold.

Sandy

Products Used:

Wednesday, July 28, 2010

Buckled Purse

Rhonda Christensen created a beautiful purse cake using the studded oval buckle mold and the 5-petals blossom mold.


I knew that I had a purse cake coming up soon, so I chose this studded circle buckle mold to do this cake for a 13 year old. The mold is so easy to use. Just put the gumpaste in and use a very sharp knife to even it out, unmold and let dry. I used some silver luster dust to paint the buckle.