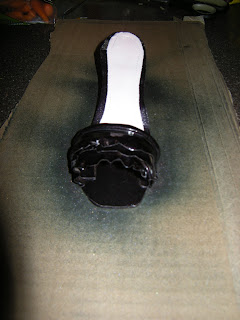
Now where can I get these in a size 9?
I am very excited to be doing another tutorial for DTC! This time around, I will be showing you all how to make a gumpaste high heel. There are so many different types out there, I decided to so a sandal type shoe. I hope you enjoy!
Materials:
Templates
Gum paste
high heel mold
shoe former
rolling pin
exacto knife
stitching wheel
paintbrush
gum glue
plastic wrap
shortening
royal icing or melted white chocolate
NOTE: A LOT OF TIME IS REQUIRED FOR THIS PROJECT. PLEASE ALLOW AT LEAST 1 WEEK TO COMPLETE. ALL LINKS FOR RESOURCES ARE AT THE END OF THIS TUTORIAL.
Step One:
Roll gumpaste to approximately 1/8 inch thick. Use template to cut base of shoe. Set on former and allow to dry for several days. It is a good idea to trim down former if needed to match height of heel (I have suggested to Foamstudio that they develop various sizes to match DTC's various molds)
Step Two:
Soften paste with shortening and fill heel mold with gumpaste. Release from mold and rest on small piece of acetate or parchment. Allow to dry completely for several days rotating every other day to allow all sides to dry. Once completely dry, attach to sole with either melted white chocolate or royal icing (better if you have time to allow to dry). There may be a small gap at the back of the shoe where the heel is attached, just fill in and smooth with royal icing or chocolate.
Step Three:
Now that the base is dry, use template to cut out the inner sole of the shoe. Use the stitching wheel to trace the outline of the inner sole and attach to base with some gum glue. (Note: If airbrushing your shoe as I have in this tutorial, leave this step for last)
Step Four:
Use template and cut out the upper part of the shoe. Use crumpled plastic wrap to make appropriate size supports for these parts. Attach using gum glue. Allow to dry completely. Remember you can attach wet gumpaste to dry paste with glue, but never dry glued to dry! For the shoe here, I used the toe strap as support. Once dried, I cut strips of thin paste, ruffled with a ball tool and layered for a frilly shoe top.
Step Five:
Decorate shoe to achieve your desired design. This may include but is not limited to luster dusts, glitter dusts, disco dusts, metallic highlighter, isomalt gems, airbrushing.....the possibilities are endless!
Tips & Tricks:
- Always make a few soles – as with any gumpaste pieces you should allow for breakage! I broke two soles while working on this project.
- To give your shoe a satin look, use a sponge paint brush and paint in long strokes with airbrush color. I use Lucks brand shimmer color for best results
- Get inspiration from fashion magazines, catalogues and online – the possibilities are only limited by your imagination!
- Embellish your finished shoe using other molds from Decorate The Cake – they offer many brooch and jewel molds. They also offer various texture mats that could give a cool effect to the shoe tops!
- HAVE FUN!!!!
Resources:
Heel molds, veining mats, jewel molds, etc.
Styrofoam Shoe Former
Airbrush Color
Shoe Template


I'd like a pair in red please. :-) Nice!
ReplyDeleteVery Nice Mark, I think I would like mine in Size 9 and black white a white ruffle....
ReplyDelete