Showing posts with label candy melts. Show all posts

Friday, May 27, 2011

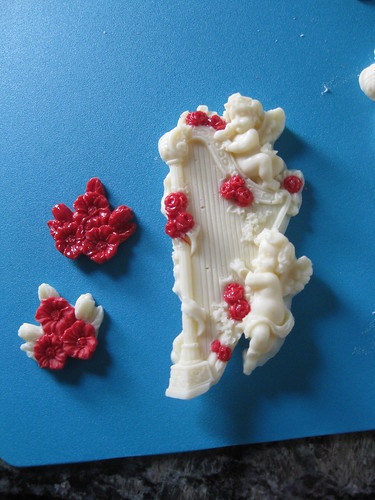
Harp with Cherubs and Roses

Beautiful!  Check out the latest DTCPUG Project.

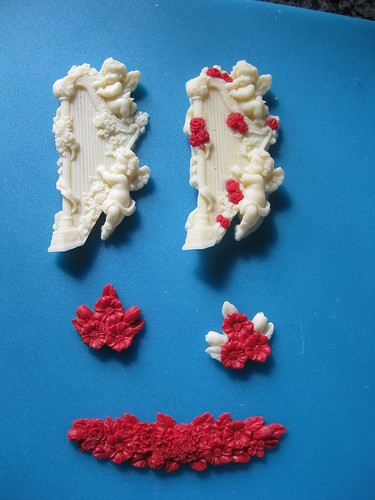
When I saw these molds I thought that the harp looked so like a Michelangelo sculpture, I tried to get that effect by using chocolate and candy melts which are opaque instead of using poured sugar.  The result does in fact look like a statue and would make a great stand alone candy piece, or be lovely atop a wedding cake or valentine. 

To make these candy molds, you can use either candy melts, or almond bark or melting chocolate.  I feel like it is more economical to use almond bark when color is not necessary.   You will also need a decorator piping bag for each color you plan to use.  Depending on the temperature in your kitchen and how fast you work, you may also like to use a heated work surface.  I use a heating pad under a cookie sheet when my candy is setting too quickly.  I also like to work with multiple molds and colors at the same time. If multi-tasking is not your thing, you can plan your layers of color and work one color at a time.  

Put your candy melts or chopped up almond bark into the decorators bags.  Melt in the microwave at 30 second intervals one bag at a time. Be sure to check for hot spots, mash the bags around to mix, and towards the end I often drop down to 15 second intervals to ensure that I don't burn the candy or melt the plastic. Depending on how fast you work and the temperature in your work space you might need to experiment with out long you melt your candy. 


Once the candy is melted, snip the tip of the bag.  For very fine detailed work, go about 1/8th of an inch.  For larger areas, you can go a bit bigger. 


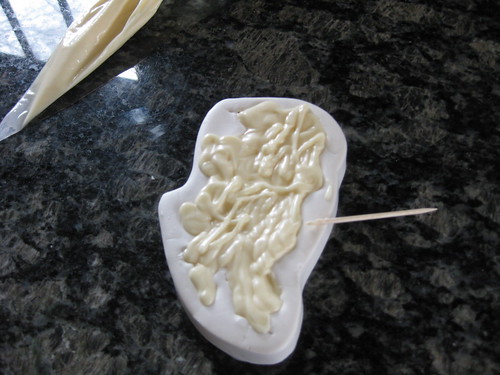
For solid areas of color, you can use the tip of your bag to get down into the details and fill in as you go. The neater you are when you fill now, the less clean up you will have to do at the end.  After you have filled the mold, take a toothpick and use it to stir and smooth the candy and clean up the edges of the mold.  If you have no colored details, you can also use the toothpick to ensure the candy has gotten into all the corners of the mold. 


If you would like to add colored details, you must do that before you fill in the main color.  Here, I piped in the roses and let them set prior to adding the white. 


This particular mold has many fine details, so it was important to have very warm melted candy and a fine tip to get into the little corners.   I sometimes have a hard time seeing what the details will be from reversed image you get looking at just the mold, so before I choose to add color I like to create a solid candy in the mold and look for things like flowers or ribbons that I want to have in color.  If you hate the solid one, you can always re-melt the candy and use it again.  Be careful when you re-melt the candy melts or chocolates.  They do not always melt as slowly the second time, and if you try to re-melt them too many times they do get a bit funky. You can some times get uneven color or spotting or a bit of a frosted white look to your end piece as the repeated melting affects the tempering of chocolate. 

Once the detail colors have set, fill in with your back ground color.  This time as you smooth with your toothpick, be aware that if you stir too deeply you can end up mixing in your contrast color.  This is a nice effect if you are going for marble or swirls, but if you want crisp edges you should avoid poking down too deep. 


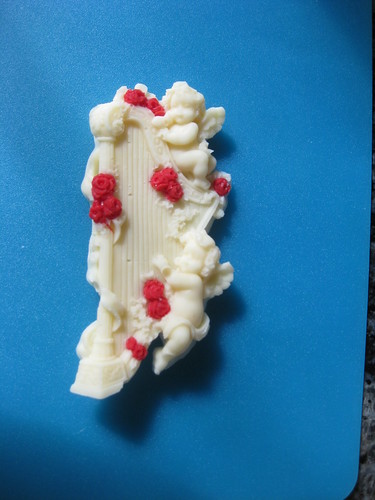
Now, wait for your candy to set. If you are impatient you can put them in the freezer to speed up the process. When I remove the molds, I loosen all around the edges before I pop out the entire piece.  DTC molds are extremely flexible, even out of the freezer. Here is a close up of the harp with red roses. 


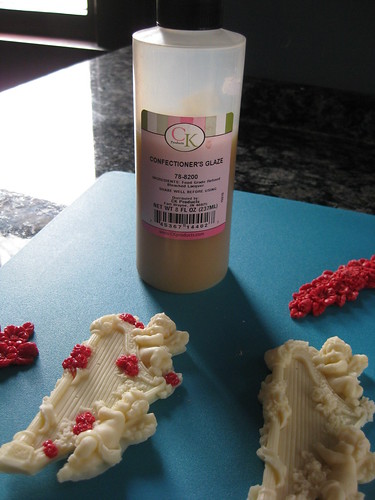
If this is a show piece and you really want to make it pop, brushing on a dab of Confectioners Glaze will make your candy very shiny.  I used it on only the roses to add to the contrast.  


In this image you can see, the solid red flowers are glazed, and the ones with contrasting white buds are not. You can also see how the roses on the harp stand out, making the matte white look more like marble or an ivory statue.  It is a very nice finishing effect. 


Product Used:

Thursday, March 3, 2011

Candy Melt Sugar Bottle - Tracy Gamblin

To show how versital the sugar bottle mold can be, Tracy Gamblin, show how to make candy melt sugar bottles -- I love the idea of making the bottles of chocolate and before putting them together filling them with mini-candy for an additional surprise!  Thanks Tracy!

Hello, I choose to do a tutorial using the DTC half soda bottle mold. I ended up doing three different types of sugar bottles, however this tutorial will concentrate on the candy melts one. All three bottles are in the final picture at the end of this tutorial.

Items needed:
DTC half bottle mold
1 bag Wilton Candy Melts
Wilton Pop foil wrappers (I like the 4 colors one)
Wilton candy bags
Misc brush for melted candy
18/0 spotter brush
4400 angular brush
Clear vanilla
Wilton gold dust

Begin by filling the candy bag ¾ full of candy melts. Melt in microwave for 35 seconds at a time. Check bag and knead the bag until candy has melted completely. Bag will be very warm but should not burn your hand.


Cut tip off bag and fill mold with melted candy and use brush to cover the whole bottle mold. Before putting completed mold in refrigerator to set tap lightly on counter top to get air bubbles to the surface. Refrigerate until set approximately 15-25 minutes.


Want to see what happens when the mold doesn’t come out like it’s supposed to?
I love this!  Glad it's not just me that this happens too!


I did one more half mold than I was ready to attach both halves. I did this by using the melted candy bag and squeezing a line to attach both halves.


The two halves harden within five minutes than I used a knife to shave off the bulky parts and used my fingers to heat the candy as I smoothed out the joined sides. I recommend using a paper towel to hold the completed bottle while working on it, especially if you have hot hands like I do. What’s that old saying…warm hands warm heart? Not quite sure if that’s it but it works for me.


Next I decided to “paint” the bottle with clear vanilla and some Wilton gold dust. It was fun to play around and paint “whatever moved me”. I used a spotter brush 18/0 and then used a 4400 angular brush to do the label. I wanted a soft gold label so that’s why I used the Wilton gold dust. I think the Aztec gold luster dust would really “pop” more though. I also think using an edible image on top of the gold label would be fabulous; however I did not have any on hand for this tutorial.


After completing the painting I cut a small square piece of the Wilton Pop gold foil and put it on top to give it more of a realistic feel. I’ve also included in the final picture all three bottles I worked on this week.


I wanted Melissa of DTC to see how beautiful the blue venuance pearls came out when I did them in the mold. I did do a third bottle and it’s only a half bottle. It was made with a ½ cup of granulated sugar and ½ cup of Karo light corn syrup. The two ingredients were heated to 300 degrees than poured into the mold. I filled the mold completely so it would look like root beer was in the bottle. There were a lot of bubbles but I still like the look of it.

Thank you, Decorate The Cake for allowing me to do this tutorial and “get over” my fear of making sugar bottles.

Saturday, July 17, 2010

Mirror, Mirror on the Wall

Check out the project that Melissa Capyk completed with our mirror mold.


Hi! My name is Melissa Capyk and I am the owner of Wild Cake in southern Ontario.

For my first project, I chose to work with the absolutely gorgeous Hand Mirror mold!

To remove your piece from this mold requires patience! It is a very large mold, so go slow! I pulled the mold away from the sugar bit by bit all the way around the frame, and released the handle as well (that's the easy part!) The section that is actually the "mirror" is a little trickier, as it is sort of suctioned to the mold. Gently but firmly pull at the mold from different angles... eventually you will get a spot to let go, then you can ease the rest of it off!

I first casted it in white candy melts. First attempt resulted in 3 pieces. I was a little too aggressive trying to get the middle section to release. 2nd attempt worked like a charm though! The detail is really pretty on this mold; I dusted the mirror section with silver luster dust, and then the frame in a pearl ivory color to hi-light the details and make it look like old ivory.


Then, I tried clear isomalt. Brought the isomalt up to 335 degrees F nice and gradually so it stayed clear. I did get a little bit of bubbling from the mold, but that is likely due to the fact that it is brand new, and hasn't had a chance to off-gas (I only had it out of the package a few hours before I started to play!!) I popped the mold into the fridge for a few minutes to make sure it set well (no more than about 10 minutes though, or the sugar will start to get sticky!)


For this version, I also experimented with some silver leaf I had purchased a while ago. VERY touchy stuff! That's a whole other tutorial which is better explained by people who have done it frequently, but I will say you must hold your breath while using this stuff; even a slight puff of air will send it flying! I very slightly dampened the area I wanted the leaf to stick to and applied it, then buffed it with a large soft makeup brush. If you get any stick to any part of the frame; stop and remove it immediately as it will start to stick very quickly. (you can scrape it off though!)


Then I used the ivory dust again on the frame; this time it was a much more subtle effect.


Next I painted the jewels in the frame very quickly with a combination of turquoise dust and confectioner's glaze.


After that, I added some green around the edge of the mirror & on the handle for some additional interest. This was a little too much on the translucent frame, but I suspect would have worked well if I had painted the frame a solid colour.


I also experimented with gumpaste, but I had some issues with it moving in the mold and making a double impression. The issue may have been my gumpaste, so I have made a fresh batch and will experiment with that soon! Because this is such a large mold, there is the opportunity for it to stretch as you roll out the gumpaste into the mold. I believe my gumpaste was a bit too stiff, so I was having to roll it too hard.

Thank you Mel for the chance to play with this mold!

Melissa Capyk
http://www.wildcakes.ca/

Products Used:
Jeweled Hand Mirror