Showing posts with label cookie. Show all posts

Saturday, February 16, 2013

Dinorawr!


How many dinosaurs do you see on this cake? You might have to look close to see all three in their natural habitat of fondant grass, leaves and polka dots!


I used fondant with tylose powder for the these dinos. I filled the molds to the top and cleaned the edges of the mold by removing any excess.  Place the mold in the freezer for about five minutes and they  will pop out very easily. I brushed with  pearl dust to bring out the detail on the tiny ones.

The cookies were a nice size for the favor boxes which I picked up at Michael's. Cookie tiles seem to be a popular trend. These little dinos are the perfect size for them. This is about a 1 inch square cutter.
The cookies are decorated with royal icing. Party City carries sixlets in EVERY color.


Volcano cake pops were actually easier to dip than round ones. I worried they would fall off the stick but I did not have any trouble with that. I dipped the stick in chocolate and pushed it halfway into the pop and covered completely. The advantage of plastic sticks is that they can be wiped off if  any chocolate should drip onto them.


I put a small handful of orange melting chocolate wafers into a disposable pastry bag with a pinch of paramount crystals and melted on half power until melted. Be sure to take the bag out and squeeze the bag to distribute the heat evenly during melting.  Cut a small hole off the the tip of the bag and pipe some orange lava on the pop.

Repeat with yellow chocolate.

Use the pastry bag of melted chocolate to attach the molded dinos!

Did you know you can  use the deeper molds for making cookies?
Fill the mold and freeze for about 3 minutes and place on a parchment lined cookie tray.

Bake at 325 for 10 - 12 minutes. Watch carefully, remove when the cookie looks dry and just before it begins to brown. I used a Wilton Roll-Out Cookie Recipe from an old year book. It is not necessary to add the 2 teaspoons of baking powder because you do not want it to rise so I omitted it.


Roll-Out Cookies
1 cup butter
1 cup sugar
1 large egg
1 teaspoon vanilla
3 cups flour

Preheat oven to 325 degrees. In a large bowl, cream butter and sugar with a hand held mixer. Beat in egg and vanilla. Mix in flour one cup at a time, mixing after each addition. Divide dough into small bowls and add several drops of gel food coloring to each bowl. Knead in the coloring with your hands until evenly distributed.  No need to chill dough before using, but if you are working with several colors, you may want to refrigerate the dough you are not using.


Vendor Credits:  Party Styling and Desserts by Jeannie GearinThepastrytip.com


Products Used:


Tuesday, October 9, 2012

Halloween Dessert Table

Jeannie Gearin does it again with another amazing blog post.  This time it is a great idea for Halloween!


 A Halloween Dessert Table with a vintage feel, the dark colors and harlequin patterns
repeated throughout to give a sophisticated look. The cake is fondant with a hand
sculpted face. The crow is painted with gel colors.

Halloween Fangs

 The cupcakes have fondant fangs. They can also be  made in isomalt with red for the incisors, giving a bloody look!


Lady Skeleton and Pirate Skull

 When filling the mold, it is easier to fill with too little and then add more
as needed rather than using too much. With a small amount of paste you can see
where the details are and be sure to fill those areas carefully.
I like keeping my paste under a glass when I am going to use it a lot. It is easier
than rewrapping it in plastic wrap over and over.


 I find safety scissors are one of the best ways to cleanly
remove excess paste if you do end up with some. Push it to
the center, making sure the edges are clean and crisp.


 When adding a second color, I just add it right on top without
any water or other type of glue. The paste is fresh and it adheres
on its own. I place on the freezer for about 5 minutes to get
the most out of the details.


 When you overfill areas you will get this type of look which to a decorator is not
great but to anyone else is still impressive. I hope you can see the detail of the teeth
on that skeleton.


 The plates and candy bowls are from Target. The favor bags and candy tubes are at Michael's.
The Halloween Banner is from ButtonsandBells on Etsy.


Dessert Table by Jeannie Gearin


DTC Products Used:
For more amazing work from Jeannie, check out her blog, The Pastry Tip!


Sunday, April 10, 2011

Catch of the Day : Crappies & Trout

Someone after my own heart!  Can you belive these are Cookies?  Joanne, you out did yourself with these!  Now finally, a kind of fish I would have no problem eating!!!!!!!


-->
We have always used chocolate, modeling chocolate, gumpaste, fondant and other forms of sugar paste, venuance pearls/isomalt, and even gelatin with silicone molds. In this tutorial, I tried to experiment on another medium—cookie dough!!!!

I figured, why not bake cookies… since silicone molds can stand more than 350F?

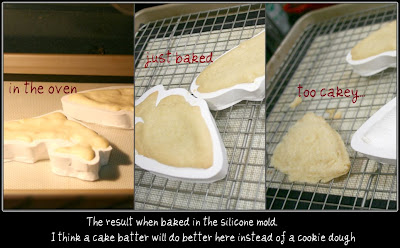
I thought of making my life easy by using a store bought cookie dough. Kneaded and simply pressed the dough into the mold and popped in the oven. But it turned out the store bought dough was a bit too cakey. It is fine to bake cookies in the silicone mold but the nature of the baked dough makes it difficult to release out of the mold, it breaks and the texture was just rough...
(but it didn't go to the trash, a little cookie monster gobbled the reject!)

***My thoughts : It might be more successful to bake brownies or blondies or use a whoopie pie or cupcake recipes when baking in silicone molds than a cookie dough....


So I got back to my baking station, this time I will not bake the dough in the mold but use the mold to shape the dough. From what's left with my store bought cookie dough, I added a bit more flour and I kneaded the dough just right and floured the mold. Considering the lessons learned from previous bake, I pressed the dough into the mold , not too filled and approximating the thickness to be 1/8 inch. I released the dough off the mold and let it stand for 10-15 minutes before baking. Placed it in a 350F oven for 12 minutes and it was just a perfect little crappie cookie!!!

Then I did the trout..a bit tricky on the fins and tail side , and if it breaks, just stick it to where it should be in the trout's body... no worries, as it is just going to mend itself well with the rest of the cookie when it rises a bit when baking.

A freshly baked cookie is very fragile. Wait for 3-5 minutes before taking it off the cookie sheet. Then transfer it to a cooling rack.Make a glace and brush over the cookies, just brush once. Let the glace set. The glace will be your canvass so it will be easy to paint on with the food color, petal or luster dust.

Use vodka or lemon extract to help dissolve the food /petal or luster powder (love the luster powder on the fishes..realistic!!!). Now its time to use your painting skills. Use blending techniques. Use different size brushes and preferably soft bristles. It is best to get a reference picture while you paint so it will come up real.

Crappies & Trout Cookies....a sweet catch of the day...
so good with a freshly brewed cup of coffee!!!

BTW, I did have a couple of broken cookies…

Enjoy Decorating!
Joanne Wieneke
www.thelittlecakepatch.com

DTC Products Used:
Trout
Crappie