Showing posts with label fish. Show all posts

Monday, June 9, 2014

Creating an Isomalt Pond


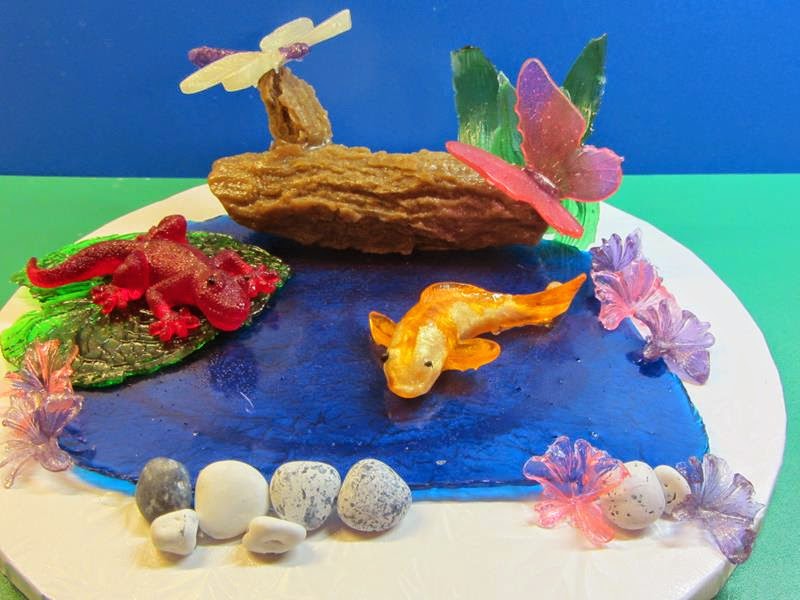
Today we will make the base pond and add the elements created in previous blog posts to get a great little pond scene.  

First use some aluminum foil, you will want to use a non-stick foil or if you do not have a non-stick foil use foil that you spray with cooking spray and then lightly wipe the excess off leaving a thin layer of spray.  

Wrinkle the foil up a bit, then smooth it back out.  The wrinkles add additional dimension to the back side of the isomalt.  Next manipulate the foil to build a dam to keep the isomalt contained when pouring out the pond.  Place the foil onto a silpat to help protect your workspace.


I used CakePlay Blue Isomalt Nibs, but you could use clear and add blue food coloring.  Place the nibs in a microwave safe container with a pour spout to melt, warming in 15-30 second increments until fully melted.  Stir with a bamboo skewer and let sit to allow bubbles to dissipate.  Then pour the isomalt onto your prepared foil.  Maybe you can aim better than I do and actually keep it all in the dam.  


You don't have to fill the entire area -- this is just a guide.


Once the isomalt is fully cooled gently pull the foil away from your pond.  


Invert onto a silpat and peel back the foil.


Place the pond the cake board or a cake top.  Using isomalt as your glue start adding in all of the elements created from out previous blog posts.

Dragonfly Directions
5 Petal Flower Directions

 Butterfly Directions


Log Directions


DTC Products Used:

Sunday, April 10, 2011

Catch of the Day : Crappies & Trout

Someone after my own heart!  Can you belive these are Cookies?  Joanne, you out did yourself with these!  Now finally, a kind of fish I would have no problem eating!!!!!!!


-->
We have always used chocolate, modeling chocolate, gumpaste, fondant and other forms of sugar paste, venuance pearls/isomalt, and even gelatin with silicone molds. In this tutorial, I tried to experiment on another medium—cookie dough!!!!

I figured, why not bake cookies… since silicone molds can stand more than 350F?

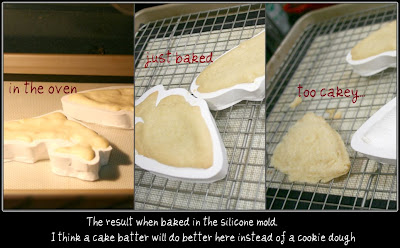
I thought of making my life easy by using a store bought cookie dough. Kneaded and simply pressed the dough into the mold and popped in the oven. But it turned out the store bought dough was a bit too cakey. It is fine to bake cookies in the silicone mold but the nature of the baked dough makes it difficult to release out of the mold, it breaks and the texture was just rough...
(but it didn't go to the trash, a little cookie monster gobbled the reject!)

***My thoughts : It might be more successful to bake brownies or blondies or use a whoopie pie or cupcake recipes when baking in silicone molds than a cookie dough....


So I got back to my baking station, this time I will not bake the dough in the mold but use the mold to shape the dough. From what's left with my store bought cookie dough, I added a bit more flour and I kneaded the dough just right and floured the mold. Considering the lessons learned from previous bake, I pressed the dough into the mold , not too filled and approximating the thickness to be 1/8 inch. I released the dough off the mold and let it stand for 10-15 minutes before baking. Placed it in a 350F oven for 12 minutes and it was just a perfect little crappie cookie!!!

Then I did the trout..a bit tricky on the fins and tail side , and if it breaks, just stick it to where it should be in the trout's body... no worries, as it is just going to mend itself well with the rest of the cookie when it rises a bit when baking.

A freshly baked cookie is very fragile. Wait for 3-5 minutes before taking it off the cookie sheet. Then transfer it to a cooling rack.Make a glace and brush over the cookies, just brush once. Let the glace set. The glace will be your canvass so it will be easy to paint on with the food color, petal or luster dust.

Use vodka or lemon extract to help dissolve the food /petal or luster powder (love the luster powder on the fishes..realistic!!!). Now its time to use your painting skills. Use blending techniques. Use different size brushes and preferably soft bristles. It is best to get a reference picture while you paint so it will come up real.

Crappies & Trout Cookies....a sweet catch of the day...
so good with a freshly brewed cup of coffee!!!

BTW, I did have a couple of broken cookies…

Enjoy Decorating!
Joanne Wieneke
www.thelittlecakepatch.com

DTC Products Used:
Trout
Crappie