Showing posts with label butterfly. Show all posts

Monday, June 9, 2014

Creating an Isomalt Pond


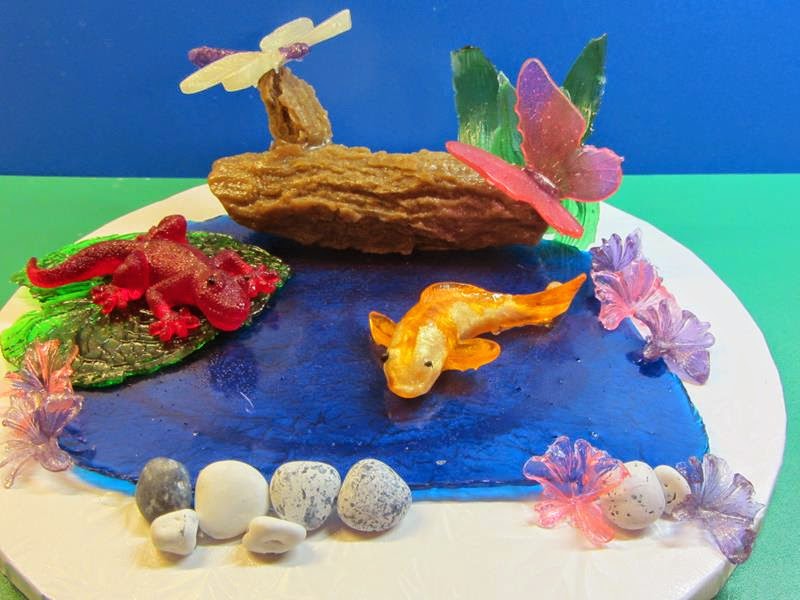
Today we will make the base pond and add the elements created in previous blog posts to get a great little pond scene.  

First use some aluminum foil, you will want to use a non-stick foil or if you do not have a non-stick foil use foil that you spray with cooking spray and then lightly wipe the excess off leaving a thin layer of spray.  

Wrinkle the foil up a bit, then smooth it back out.  The wrinkles add additional dimension to the back side of the isomalt.  Next manipulate the foil to build a dam to keep the isomalt contained when pouring out the pond.  Place the foil onto a silpat to help protect your workspace.


I used CakePlay Blue Isomalt Nibs, but you could use clear and add blue food coloring.  Place the nibs in a microwave safe container with a pour spout to melt, warming in 15-30 second increments until fully melted.  Stir with a bamboo skewer and let sit to allow bubbles to dissipate.  Then pour the isomalt onto your prepared foil.  Maybe you can aim better than I do and actually keep it all in the dam.  


You don't have to fill the entire area -- this is just a guide.


Once the isomalt is fully cooled gently pull the foil away from your pond.  


Invert onto a silpat and peel back the foil.


Place the pond the cake board or a cake top.  Using isomalt as your glue start adding in all of the elements created from out previous blog posts.

Dragonfly Directions
5 Petal Flower Directions

 Butterfly Directions


Log Directions


DTC Products Used:

Sunday, January 8, 2012

Isomalt Butterfly


The supplies:


- Silicone butterfly wing molds
- Isomalt stick from CakePlay
- Hot pot for melting isomalt from CakePlay
- Silicone cupcake liner - I use it to melt the isomalt but you can used whatever you normally use
- Toothpick - not shown
- Silpat - not shown


First I broke up the isomalt stick and placed it in the silicone cup. Microwave in 15-20 second increments until all melted. 


 Carefully pinch the silicone cup - be gentle and cautious so that you do not spill the hot isomalt on your fingers.  Pour a steady stream into the mold.


I found it necessary to gently coax the isomalt into the point of the mold.

Set mold aside for a bit to cool and firm up.


Once set and barely warm to the touch begin to gently pull the silicone away from the isomalt.


Gently dip the edges of the wings into the hot pot getting a little isomalt on each side of the butterfly wings.


Press the wings together over a non-stick surface - I used a silpat.  As you press them together the isomalt you gathered from the hot put will bunch between the wings creating a body for the butterfly.  


When you pulled wings away from the hot pot strings of isomalt will be drawn way from the pot.  I used bits of this to push into the still warm body and create the antennae.  Prop the wings up so they will be positioned how you want.


 A finished butterfly!

Products Used:
Butterfly - Monarch Wings Mold
Other Butterfly Molds:
Butterfly - Regular Wings Mold
Butterfly - Slim Wings Mold
Butterfly - Stained Glass Mold

Cake Play


Tuesday, July 27, 2010

Beautiful Butterflies!

Jessica Montoya created some beautiful cupcakes using butterfly wing molds.


I used white chocolate which I quickly melted in the microwave. I filled the mold with the melted chocolate and tapped the mold on a flat surface to remove any air bubbles and I cleaned away any excess chocolate with a small spatula. I placed the mold in the refrigerator for about two minutes to set. Once the chocolate was firm I removed the wings from the mold with great ease. I then dusted the wings with pink and green pearl dust to bring out the beautiful details. I attached the wings to the cupcakes using icing and then created the body of the butterflies with the same white icing which I then dusted with pink pearl dust.

Jessica

Products Used:

Similar Products: