A HUGE thank you to the talented Shannon Bond of Shannon Bond Cake Design for this lovely tutorial using our bead border molds.
Mother of Pearl Finish using the DTC Bead Border Molds
For this cake, I used a combination of the #2 and #3 Decorate the Cake Bead Border Molds on the bottom tier and the #2 Bead Border Mold for the design on the top tier. Can I just tell you how awesome it was to not be finding pearls in the nooks and seams of my floors like I do when i place them by hand?! These molds have so many design possibilities and are so user friendly with the great quality always produced by DTC.
Supplies Needed:
DTC Bead Border #2, white fondant, small rolling pin, paintbrush, palette knife and airbrush colors in Pearl Sheen and Copper (I used Americolor).
Press the fondant into the mold by hand. Using the small rolling pin, roll into the mold to evenly distribute the fondant into the mold pattern.
Remove excess fondant with a palette knife. Chill in the freezer a few minutes to make removal easier.
Placing the mold fondant side down, gently flex the mold and peel it back to remove the chilled fondant.
Painting the Mother of Pearl finish.
For the bottom tier of the cake, I applied the fondant strips to the cake before painting the color. For the top strip, I applied the color using this process.
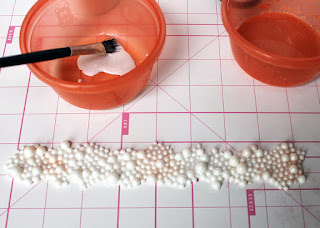
Using a stiff paintbrush, paint the fondant pattern with the pearl sheen, making sure to get the color into the details.
Mix the copper airbrush color with the pearl sheen and dab into the fondant. Gently blot the color until the desired amount remains. If the copper is too bold, paint over it with more of the pearl sheen to mute the copper to the desired shade.
Let the fondant strip dry overnight and apply to the cake by brushing the back with a little bit of water and pressing onto the cake.
Stand back and enjoy the dramatic results! Can you imagine the countless effects painting different shades onto the fondant beads? So many amazing design possibilities!
Check out more of Shannon's amazing work on her website, Shannon Bond Cake Design, or follow her on Facebook.
DTC Products Used:
Trim - Bead Border 2
Trim - Bead Border 3
How to Make Cute Turkey Cupcake Toppers
1 year ago


