Here is more Easter Fun from our DTCPUG member, Stephanie! Beautiful work and love all the different mediums that were used. I love the idea of using jello in the molds!
You'll find a million and one reasons to use the fabulous cross molds at DTC! My post today will walk through some examples and step-by-step instructions for using chocolate, sugar, and for a new twist, (perhaps as a low-calorie Easter dessert?) Jello!
First, Chocolate!
You've already seen
one creative use for this gorgeous floral cross, now here's a how-to for a more traditional version.
Usually I like to work on a warm surface so that the chocolate doesn't set up too quickly, but I tried this mold a few ways and found that actually it is helpful if one color sets up before you start the next, so I skipped my usual cookie-sheet-on-a-heating-pad work surface. I used melting chocolate and microwaved (in 30 second intervals) a small amount in a decorating bag. Again, I tried it a few different ways and it didn't seem to make much of a difference if you start with leaves or flowers, but I would suggest making sure that you pipe the centers of the flowers first before the petals.

Pipe just a tiny dot, taking care to "stay within the lines" and pull straight up as you ease off pressure on the bag. Keep in mind that it is ok to over-fill UP but not OUT. By that, I mean that once our details in color are laid down, we'll be filling in the whole mold in a background color, so as long as you keep the chocolate within the intended area, it's ok to have it mound upward a little. Jump down a few pictures and you can see that I covered up some of the yellow centers when I piped in the purple petals - also just fine since the front will show the yellow we put down first.
The leaves and stems are by far the trickiest part for this mold - and the prettiest! There are tiny vines all throughout that were very hard to pipe into - I would recommend starting with as small of a hole as you can get in your piping bag. Take a toothpick to 'force' some of the chocolate down into the tiny crevices. You can also use the toothpick to 'clean up' any extra chocolate that might have mistakenly gotten outside of the design area. I actually got good results by forcing the tip of the bag all the way into the crack and then giving a light squeeze while pulling along the stem slowly. It is easy to get burnt-out on the leaves and start to get messy. If you find that you're getting tired or your chocolate is getting stiff, take a break and re-melt your bag of chocolate.

Your next step is to fill in the remainder of the mold with your background color chocolate. You can either pipe in, or CAREFULLY pour in very melted/runny chocolate. I preferred the piping method as I had more control.
To help get out any air bubbles, tap the mold down on the table. I do this by picking up the whole mold an inch or two - take care to keep it steady and level - and dropping it down to the table. I did this several times - upwards of twenty - and you'll know you're doing it right when you see little bubbles rising to the surface and then popping.

If you poured in chocolate and the back is messy or you really want a very flat surface on the back, then scrape the back with something long and straight like a big angled spatula (I used the flat edge of a bowl scraper and it worked great). Just make sure it's long enough to make one clean pass without 'dipping' into any area of your cross as you pull it along. If you piped carefully I would skip this step as unnecessarily risky- it's very easy to take off too much or mush the colors around as you're doing it.
Then, just pop the mold in the freezer until the chocolate is set up, and carefully remove your finished piece. I was worried about snapping the thing in half at this point... go slowly, with a 'peeling' sort of motion, and use the mold's incredible flexibility to your advantage! I took a toothpick and cleaned up the edges slightly - just don't hold the chocolate in one place for too long or you might start to melt it with the warmth of your hands. You can also go around the edge while it's still in the mold.
If you worry about things like having a super neat edge all the way around, then try piping in your background color around the edge before you put the flowers and leaves in. When I did this I over-filled in a few places and had to use a toothpick to fix my mistakes. You can see where I didn't remove enough of the white and it is interfering with the flower design. To fix this, I just scraped away a little of the white, and piped on a new yellow center.
Ta Da! I just love this mold, no matter what the color combination you choose it looks great. I tried two-toned green for the different kinds of leaves and will probably do that again in the future, perhaps with an even bigger contrast. I also made a plain chocolate cross for a 'manly' confirmation cake. You can find these molds
here and
here on
decoratethecake.com.
On to sugar!
I have been wanting to experiment with venuance pearls, and DTC has a variety of wonderful colors
here . I don't have the adorable little silicone prep bowls that you may have seen in other DTC blog tutorials. (Where DO you get those?!) I considered melting in glass (seemed like a bad idea if only for the clean-up after...) and then I considered melting in a different mold from DTC that happened to be somewhat bowl-like or at least was big enough to hold a few melted pearls and have somewhere to 'pour' out of. Then it came to me- I DO have silicone cupcake liners! Crisis averted!
Before I started, I busted out some rubber gloves, and a bucket of ice water-- just in case. Better safe than sorry. I would also recommend that you use VERY dry molds- there were a few tiny drops of water in the crevices of
this lovely cross mold I used and when the hot sugar hit them they hissed and popped in a very frightening way. My husband made me put on safety glasses to pour after that. :)

I started off with the red center - I melted a few pearls in a cupcake liner (took about two 30-second intervals) and carefully poured into the mold. I didn't pour quite enough and had to touch-up some spots around the edges by re-melting and pouring drop by drop right where I needed it. A toothpick can help to guide but the sugar will also stick to it, so you have to balance messing with it too much might make things worse.
Next I mixed a few yellow pearls with a few blue pearls to get a very pretty green for the leaves. I waited for the sugar to cool just slightly so that it was not so runny before pouring it in the mold and I was able to maintain better control of how much went in.
The yellow leaves/swirls were next, and these were a headache. I think I was over-ambitious with my first venuance pearl project. I should have been happy with one or two colors, and this particular mold does not have very well-defined boundaries for the area I was trying to keep the yellow in, so I kept over-pouring.
Sometimes I could take a toothpick while the sugar was still warm and sort of trim away the excess. Other times it got stuck to the toothpick and pulled out the whole piece of sugar. In the end I would just re-melt those pieces and try again. I settled once I got close and moved on to the next part - filling in with clear.

I'm not sure if the prep-bowls I don't have are specialized or perhaps thicker, but the cupcake lines I was using definitely got warm when the sugar was melted inside. I was glad to be wearing the rubber gloves, and even still I would sometimes let the sugar sit a moment if it had gotten super bubbly and over heated. I filled the mold to the half-way point with clear, and tapped the mold on the table to help pop some air bubbles. I also used a toothpick to pop some of the larger ones.

I mixed my extra yellow in with the green and added some more clear pearls to make a lighter green to fill the rest of the mold. I knew I needed a larger amount, but it was hard to carry the cupcake liner when it was full, so I used two liners stacked together. I ended up having just the right amount, and anxious to see how it turned out, I put it outside to cool faster.
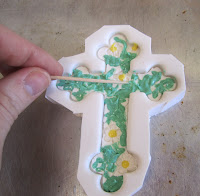
I don't know what I was thinking doing first clear, THEN green. It came out looking just all green unless you look directly from the side. Next time I'll know better. I still think it turned out really well. I'm holding it up to the light here so you can see how translucent it is and how pretty the design of the mold is.
It would be a very impressive 'topper' for a tiered cake!
And now, jello!
Perhaps you are like me, and have always been intrigued by the descriptions on DTC:
"Suggested uses include chocolate, fondant, gumpaste, poured sugar and pressed sugar. Additionally, the molds can be used for ice, jello, etc."
What was that? Jello, you say? How could that possibly work?! Quite well, in fact, as I recently found out! I was making dinner for friends, needed a sugar-free dessert, and had just received these cross molds to try out. Perfect opportunity to try out some jello molding, no? I used the same
mold as I did for the sugar.

First of all let me apologize for the red on red on red... all I had in the way of sugar free jello was, well, red. I did attempt to layer different shades of red and if you look closely you can tell the difference. This makes me confidant that I could recreate the results in a broader range of colors for a much more dramatic look. In fact, I hope some of you try it and let me know (maybe post some pictures?) on how it goes.
You will need to mix your jello first. I did a modified 'jello jiggler' recipe version as I wanted to make sure the finished product was stiff enough to maintain its shape. I used one packet of jello with one cup hot water. I did add just shy of one cup of cold water to the jello I didn't use for the mold to make the 'base' to put the cross onto.
If you're trying to do two layers in two different colors like I was, you'll want to stop pouring into your mold half-way. If you pour in too much, like I did, then just scoop it out until you get to the level you want. Let that set up in the fridge a little while (5-10 minutes). You want the jello to be set, but still 'sticky' to the touch so that the next layer will stick and not just slip right off when you un-mold. Then pour in the second color of jello. (Prepared in like fashion, one packet to one cup hot water, and the extra jello I watered down and added to my 'base'.)
Allow that to set in the fridge, then transfer to the freezer briefly. The freezing process worked great - it just popped right out of the mold - and aside from a little bit of frost that I scrapped off the back, it seemed no worse for the wear. I did ask if anyone could notice anything odd about the cross, and it apparently tasted fine and defrosted to be just like the base.
When you are placing it on to the base jello be sure that you've got it lined up really well before you let go. I would have like to have shifted it a little bit, but once it was on it was stuck.
I hope you enjoyed the tutorials! What projects will you use the cross molds on? The possibilities seem endless... a fondant cross on top of a baptism cake... maybe even a butter cross for Easter brunch?! Get creative, and have fun!
DTC Products Used:


 Mmmm....melty, warm chocolate....
 Then, I lightly shook and tapped each chocolate-filled mould so that they were evenly filled, and any air bubbles would come to the surface instead of marring my cute chocolate pop fronts. I then also tried to take an edge of a paper towel and clean up any stray chocolate smudges that had run past the edge of the mould. I could have also done this once the chocolates were cool and popped out of the mould, but I'd rather do it now and not have to do any clean-up of edges later. As you can see in the photo, I missed a few drops, but these were well within the "walls" of the mould, so I knew it wouldn't affect the chocolate creation itself.
  I put the cookie sheet in my fridge and let them sit for about 15 minutes, to harden up the chocolate. Then came the moment of truth. Would the chocolates pop out of the moulds without breaking? I certainly hadn't had any success with this using hard plastic moulds. And all the other times I'd used silicone moulds, it was for fondant or gumpaste, so this was a real test.
 I carefully turned it back "right side up", and placed the chocolate on a cookie rack to harden up for a few more minutes...


