
Good Day my fellow sugar enthusiast!!! My name is Joanne Wieneke from The Little Cake Patch. Iam presenting a unique wedding cake project using the the Mat , Fondx ,Venuance Pearls and other ways to use the rose petal veiner and lace molds from DTC.

Here is a quick overview of the MAT and Fondx:

The Mat : it is the latest “toy” in cake town. I was so curious on how The mat is used so I went to YouTube to watch the video and here is the link:
--> Amazing, amazing product...!!!
and here's what I learned : The mat is a 2-piece clear vinyl system where you can roll your fondant between and was developed by Sweetwise . It is a food grade vinyl mat that makes fondant rolling easy, keeps your hand free of shortening and cornstarch or powdered sugar. You will never need to use cornstarch or powdered sugar and therefore you will not alter the fondant’s recipe and get the best results out of your fondant. THE MAT contains 100% FDA approved materials. Vinyl mats can be found from a craft store, the vinyl sold there is for general purpose , not tested and not approved for food contamination and use, simply saying that it uses materials NOT FDA approved,there is a huge possibility that the other chemicals and materials that are NOT food safe. Aside from not being food grade, vinyl mats that you buy from a fabric or craft store has a certain amount of weight that is quite difficult to manage when covering the cake. The Mat can cover as much as 20 inches in diameter of cake. It can prevent drying when you are not ready to enrobe the cake with the sheet of rolled fondant . Since it is a 2 way system, you can flip , turn or roll the sheet of fondant while it is still sandwiched snugly in between the mat and assuring you of a clean paste. The use of the Mat makes every cake decorator's work sanitary as it did not come in contact with the counter top or board where bacteria may have been sitting on before enrobing the cake. Clean up will be the easiest after the usage of the mat.
Fondx is a premium rolled fondant icing with a nice marshmallow flavor and recently have released a new line of flavors and colors. Fondx is a more forgiving rolled fondant. It is easier to knead, to roll out and no cracking when applied on the cake. FondX is packed in a 2lb and 10 lb plastic pail and will last for 12 months in an unopened pail. It contains no nuts or gluten, and a Kosher dairy product. The ingredients consist of powdered sugar, corn syrup, assorted gum, shortening, vanilla flavor, glycerin, citric acid and preservative. Mixes and blends well with food colors and airbrush colors.
Let's use The Mat!
Before using, season the Mat by applying a light coat of shortening to the top portion of the bottom sheet.

Knead your fondant well on top of the bottom sheet and set it to a disk when fully kneaded (kneading helps to make the fondant pliable when rolling).Cover the fondant with the top sheet. Begin to roll out the fondant starting from the middle and extending it outwards, as you increase the diameter of the fondant you have to take into consideration that the thinnest part of the sheet will be at the sides so you may have to be aware of it while you roll to get an even sheet.

Once you have the size you want and the thickness (1/8 inch-1/4 inch), remove the top sheet and roll it up. It is best not to fold the mat, it might take an impression of the fold.

Lift the bottom sheet up towards the cake . Line up the bottom of the fondant circle to the bottom edge. Lay the fondant over the center of the cake. Once centered peel the mat off the fondant and let the fondant’s weight pull it away from the remainder of the sheet.
 Now the fondant has released itself from the mat and you are ready to iron and smoothen out the edges of the cake.
***If you encounter folds and pleats on the bottom of the cake, do not force the fondand down, instead try to pull the edge of the fondant out then with a cupped hand, lead it back to the cake, I would compare it as trying to tuck your bed sheet neatly on your mattress. With the help of a fondant smoother, rub it gently to assure it has adhered back to the cake..
Here's some extra "wow" factor that The Mat offers:

I experimented on a kneaded, crumpled, with tears and holes fondant and rolled them in the Mat. Amazingly, after rolling (just one way, straight roll) the fondant in the mat, it was all nice and smooth...
The Mat Clean-up and Storage

The Mat should be wiped with a clean cloth between uses. I found it easy to clean with a spray of water and wiping it off with paper towel. ***If it becomes necessary to wash it, use hot soapy water in the kitchen sink followed by a hot rinse . After rinsing, wipe excess water with paper towel and hang the sheets to dry.

Sheets are best stored rolled up together and placed in the Fondant Mat Carry and Storage Tube, it keeps them clean and protects them from getting bent or damaged.
Rating: ***** Highly Recommended !
It takes a lot of effort at first to roll the fondant in the MAT but once you get the groove, this is the easiest and cleanest way to cover your cakes...
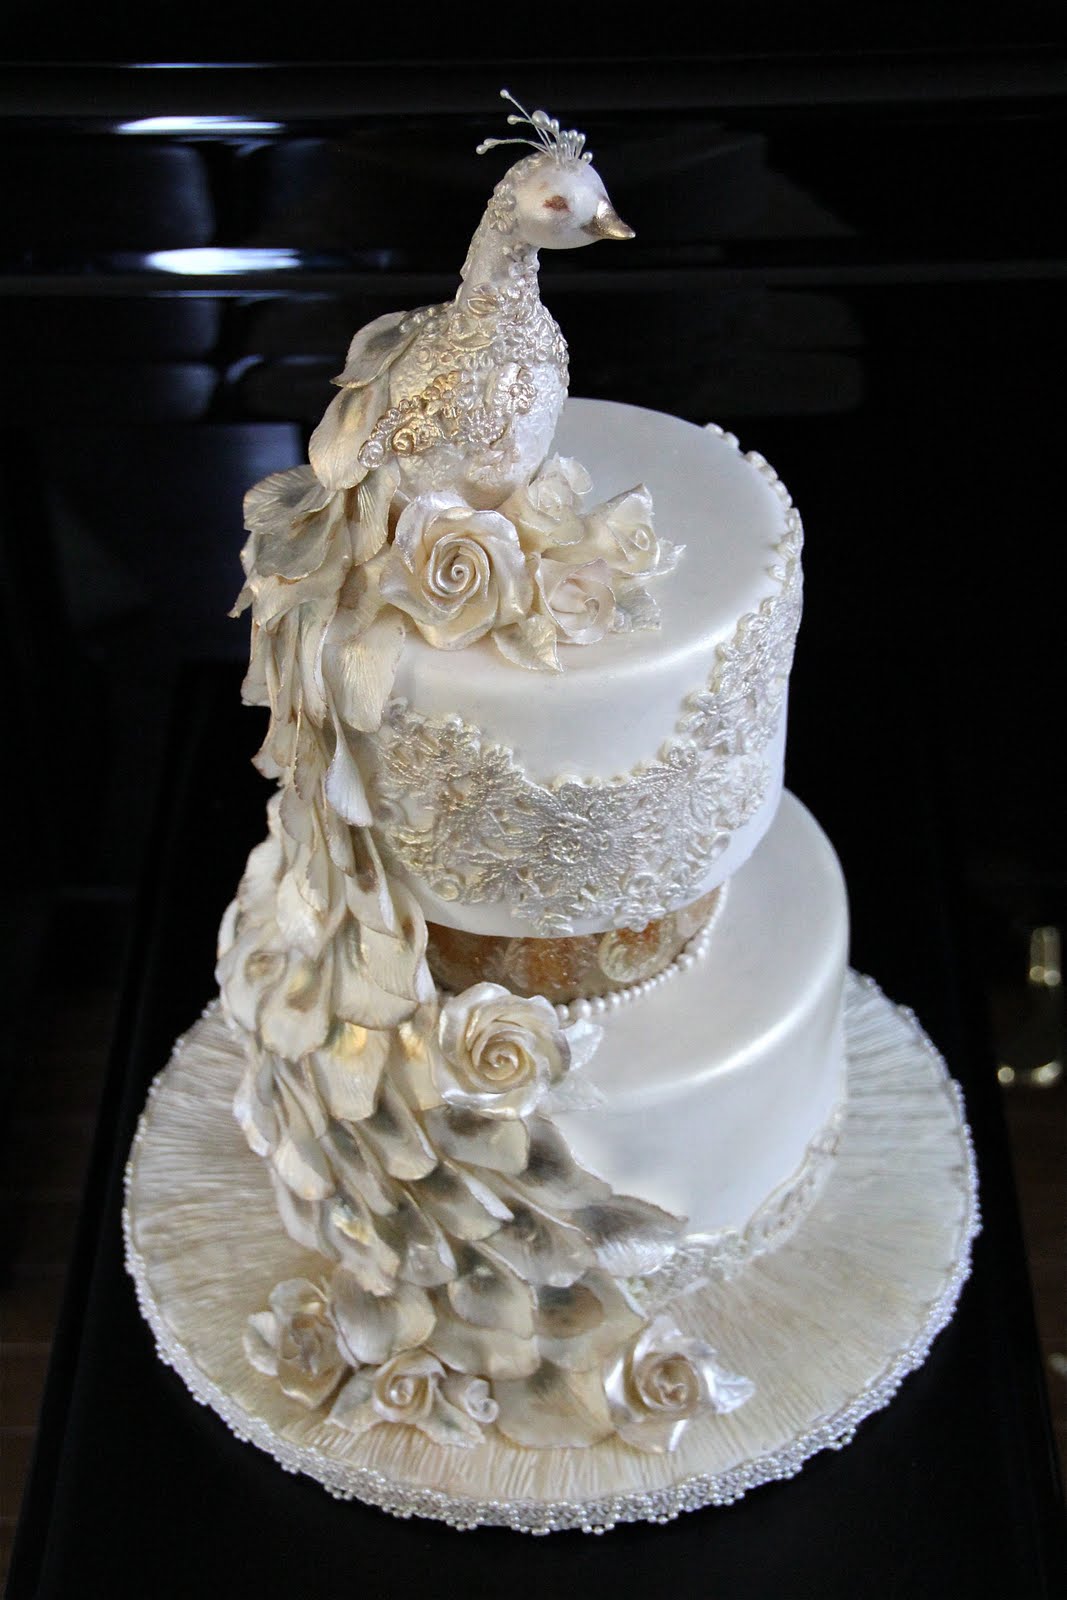
The Project: Pearl Peacock Wedding Cake
Materials and Tools:
* Cake 10 inch and 8 inch, 4 inch high each
*1 drumboard covered in fondant and trimmed with lace or ribbon on the side (edge)
*2 Cake risers : covered in gumpaste painted in gold . The 8inch is placed on the bottom between the drumboard and base cake and 6 inch riser is positioned between base cake and top cake.
-The Mat
-2 lb pail Fondx (comes with fondant stabilizer -CMC)
-2 lb Gumpaste
-rose veiner
-rose and leaf cutter
-Leaf veiner
-Lace molds
-Venuance pearls
-piping gel
-Pearl dust
-Gold dust
-turquoise or blue green petal dust
-baller
-fine brushes
-spatula, pastry scraper
-toothpick/lobster pick
-large and small rolling pin
-small silicone prep bowls
-1 pc. bamboo skewer
-and a lot of time and patience.....
The Cake
Risers: Prepare this days ahead: Cover the risers with gumpaste and airbrush or paint with gold. (risers can be multiple cardboards stacked together or styrofoam dummy but bottom side that touches the cake should be covered with cake board or foil)
Buttercream cakes and cover with Fondx. Use the Mat to make Fondx rolling easy and smooth. Dont forget to Knead it well before rolling.
Stack the cakes on the prepared drumboard. Position the 8 inch riser on the drumboard. Then stack the 10 inch cake. The 6 inch riser will be on top of the 10 inch cake and finish it by staking the 8 inch cake. Use dowels to support risers and cakes.
Lace Appliqué

Refer to the previous blogs that discusses about lace molds. http://decoratethecakeblog.blogspot.com/2011/01/tutorial-dtcs-lace-press-molds.html
Once you have cut out the lace from the mold, apply the lace on the cake as an appliqué on the cake.
( from the picture, you can see that i used a lobster pick and toothpick--this is to poke the holes and pick excess gumpaste on the laces to get finer details)
Sugar Buttons and Jewels

Using clear venuance pearls and the button molds, make as many as 40 sugar buttons by melting the venuance pearls in a silicone prep bowl in a microwave and and pouring over the button mold. (preferred and recommended method)
The molds can stand 350 degrees of heat. The Venuance Pearls will give out a lemony scent while you melt it in the microwave.
Adhere the buttons with piping gel as an embellishment on your cake. ( I chose to put the buttons to cover the cake risers).
Refer to DTC Blog for more information on Venuance Pearls
The Peacock Topper
Knead out a baseball size gumpaste until pliable. Roll into teardrop shape . Stretch the middle portion of the teardrop which will be the neck of the bird. The opposite smaller end will be the head. Pinch the tip to form the beak. Insert a damp bamboo skewer coming from the thickest part of the bird body to the neck to help support the neck from tilting down. Let it dry for 24 hours.
Use the lace mold to create appliqué laces to embellish the bird.
Position the bird on the cake. Adhere on the cake with royal icing or a sticky fondant.

Knead another baseball size of gumpaste until pliable . Roll out gumpaste thinly using the mat and cut at least 100 petals or more using the rose cutter. Once the petals are cut, put back the top sheet of the MAT on top of the petals to prevent from drying.

Get a petal and lay over the bottom portion of rose veiner. Place the top portion of the veiner and press. Now that the petal has been nicely pressed, use your thumb to stamp the middle of the petal to create the crescent shape portion of the feather. Use a baller if needed to create a smooth and wavy look on the sides feather.

Stick petal on the bird and continue process until you have achieved a train of feathers flowing down the cake. I used gum glue to adhere the feathers. I also used pearl stamens for the peacock crown.

Along the way, I decided to make roses and leaves to add to the embellishment.
Brush the laces and the feathers with pearl dust and the center of each feather with gold dust mixed with a little bit of turquoise petal dust. You can also do a very colorful peacock using shades of turquoise, blue and green and gold.
I hope that materials and new toys in the cake decorating world will be able to help you make decorating fun and convenient and the project presented as an inspiration for your future wedding or celebration cakes…have fun and keep decorating!!!
For any questions and comments, please use comments box or
email me at thelittlecakedecorator@ thelittlecakepatch.com
or DTC at Sales@decoratethecake.com
Thanks so much Melissa for another wonderful opportunity to work with you and your products...
Confectionately yours,
Joanne Wieneke
The Little Cake Patch, LLC.
www.thelittlecakepatch.comDTC Products Used:
Floral V Spray
Flora Swag
Floral Spray #2
Rose Petal 2 Piece Veiner
Dahlia Button


These items sound amazing! How do I order them.....or where can I find them?
ReplyDeleteI have a question about this cake. How do you accomplish that shiney look to the cake? if you can help me with any tips that would be great.
ReplyDeleteThank you so much
Niquola
The Mat Can be purchased at www.sweetwise.com - the veiners, laces presses, venuance pearls can be found at our site www.decoratethecake.com
ReplyDelete@Niquola : dry brushed with Super Pearl dust to get shiny effect.
ReplyDeleteIt's awesome !!!
ReplyDeleteWhat a neat post! Thank you for sharing!
ReplyDeleteThis is such a beautiful cake. Thank you so much for sharing.
ReplyDeleteDanielle x
Your peakock cake ist really grandios, you have done a beautiful job!Thank you for tips
ReplyDeleteHi, how long did it take for you to complete this? The entire design is gorgeous!
ReplyDeleteI love you!!!! Very much!!!!
ReplyDeleteThank you! this is gorgeous! i sooo want for my wedding. Hopefully someone around here will be able to make it for me :(
ReplyDeleteFantastic!!!!!!!! What a grandious Peacock!!! Wonderful job and I appreciate your step-by-step instructions and pictures! Thank you.
ReplyDeleteHi thank u for sharing this info. Do you think you can make this cake for a wedding of 180 guest? Please email me at jazzyfriends@gmail.com I email you before but forgot to ask this. My wedding will be June 2,12 in NYC.
ReplyDeleteYou will need to contact Joanne Wieneke from
ReplyDeleteThe Little Cake Patch, LLC. for information on making the cake for you.
Wow,this is the nicest peacock inspired cake I ever seen! The colour, combined technique & finishing are so amazing! By the way how can I can make layers of peacock feathers separately for transportation convenience?
ReplyDeleteWhere can I get the small lace molds that you used on the peacock
ReplyDeleteFlora Swag:
Deletehttp://decoratethecake.com/store/WsDefault.asp?One=192
Floral V Spray:
http://decoratethecake.com/store/WsDefault.asp?One=310
Floral Spray #2:
http://decoratethecake.com/store/WsDefault.asp?One=221
Thank you for sharing. A chocolate enrober will remove all the manual labor involved with hand dipping products into chocolate. They also will chocolate enrobe the product more evenly than when performed by hand.
ReplyDeleteI have been decorating cakes for several years and of all the equipment items I have, I must say the one I wouldn't be without is the Mat. It makes covering a cake with fondant a breeze...even those cumbersome 16" tiers, round or square. Thank you so much for sharing this great tutorial. I just got an order for a peacock cake and this is just what I needed to get me going on it.
ReplyDeleteI just found your article about molding the peacock. My niece is getting married in May, and asked for a cake with bird. So glad I found this! I plan to make a practice one, then get the real one made ahead.
ReplyDeleteI'm so glad I found your instructions about the peacock body! My niece is getting married in May and wants this. I have plenty of time to practice, and then make the body ahead.
ReplyDeletewow, its very unique, thanks for making it
ReplyDelete