Showing posts with label Lace. Show all posts

Tuesday, September 15, 2015

New Zoe Clark Book

Have you seen the new Zoe Clark book?


All of the cakes in the book are lovely.  I'm rather partial to the one on the cover.  Could be because I recognize the beautiful lace molds she used?

Decorate the Cake -- Applique Blossom Small


Decorate the Cake -- Applique - Mini Daisy Single


Decorate the Cake -- Applique - Blossom V


Not used but a larger version of the lace blossom.  Decorate the Cake - Applique - Blossom Large


We can't wait to see the creations you make based on Zoe's inspiration. 

Thursday, June 26, 2014

Wide Floral Lace


Thank you Sandy Swart for the great blog post for today!


Our preacher's wife was retiring from teaching from our parochial school after 18 years of teaching.  She is a North Carolina gal and has never lost her accent.  I remember years ago that she mentioned that dogwood were her favorite flower so I decided to use dogwood on the centerpiece cake for her retirement reception at the school.

The plates the school board was providing had a light aqua background with soft pink roses and a creamy hydrangea type flower printed on them.  I was supposed to create something that coordinated with the plates.  I knew that dogwood wasn't on the plates but really wanted to put 18 dogwood flowers on her cake - each dogwood symbolizing 1 year of teaching at the school.  I decided to incorporate the aqua color by using two lace pieces diagonally across two corners of the sheet cake.

The Border - Wide Floral lace press that I purchased from Decorate The Cake at a cake club DOS in Council Bluffs, NE, was the solution to my design challenge.  I mixed aqua MMF (left over from graduation time) with white fondant, rolled it out to #3 thickness with my KA Pasta roller.

I placed this over the lace mold cavity and pressed the second part of the press into it until the edges cut the fondant.  I removed the lace mold piece and cleaned up the edges by using my finger to gently pull any fondant along the edge to the middle of the lace piece.  I removed the lace piece by placing the mold and lace face down and rolling the silicon mold back to release the fondant lace.

With a little dusting with luster dust, I place the ribbon on opposite corners and trimmed the lace to the angle of the cake edge.  I chose those two particular corners so that my dogwood branches and lace pieces would leave me an open area in the bottom left of the sheet cake to write the message.

I piped the branches on, placed the gumpaste dogwood flowers on and then piped a few leaves with green (again coordinating with the green in the paper ware). Since there was a predominate color of pink on the plates, I chose to print the salutations in pink to incorporate the color onto the cake design.  Since the parochial school is preschool-8th grade, I chose to print the words  so that the younger children could read it.  We all call her Amy but the children address her as Mrs. Hofman so I decided the message should be:  "We will miss you, Mrs. Hofman!" 

When I look at a lace mold, I immediately contemplate in my mind how I would use it on a wedding cake.  Sometimes we just have to "think outside of the box" or our "norm".  I was happy with the end result on this sheet cake using Border- Wide Floral  silicone mold from Decoratethecake.com 

For Step-by-Step directions, with photos on using a lace press, check the  Lace it Up! blog post.

Any questions?  You can contact me through Sandy Swart Cakes on Facebook or at sewsweet2@hotmail.com
Albums of my decorated cakes can be seen at:  http://flickr.com/photos/sewsweet2/sets

DTC Product Used:
Border - Wide Floral

Thursday, January 23, 2014

Triple Scallop Trim

I would like to send a big Thank You to Kathy Finholt for helping me out with the latest blog post.

Kathy sent me a piece of her favorite lace last year telling me that she could no longer buy the lace and wanted a mold.  No pressure on me to make sure the mold came out!  Lucky for us both it turned out well.   I sent her the finished mold and she finally had an opportunity to use it to add a lovely border for this simple anniversary cake.


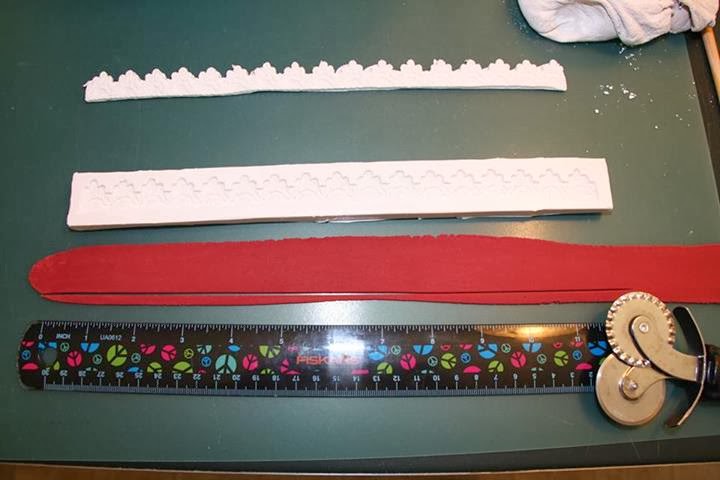
Start by rolling the fondant to a 3 in the pasta machine.  Then using a ruler as a guide and rotary cuter cut the bottom edge straight prior to placing it in the mold.


Next lay the fondant in the mold and place the insert on top.  Press down gently on the insert to ensure you get a nice impression.  Remove the excess fondant and clean up the edges.  Remove the insert and flip the mold over.  Slowly roll the mold back off the fondant gently coaxing it out of the mold.  Releasing this way helps to prevent distortion of the pattern.  Finally apply to the cake.

Additional details on using this mold may be found on the blog post "Of Corset's Lace!"

To see more beautiful cakes by Kathy check out her Facebook page, Kathy's Kakes, LLC.

Products Used:
Triple Scallop Trim

Thursday, August 15, 2013

Of Corset's Lace!


My neighbor asked me to make her a corset cake for a bachelorette party.  Of course, I thought this was the perfect opportunity to use two of DTC's newest lace molds.

What you will need - some fondant (or gumpaste or 50/50 or medium of your choice), a palette knife, rolling pin and lace mold.  You can use pasta roller if you wish but since I didn't have much to do I just rolled mine out.


When I rolled out the fondant I made sure it was large enough by laying the insert on top of my rolled piece.


Next lay the fondant on top of the mold and place the lace insert piece on top.  I then apply gentle pressure tot he back side with one hand as I remove the excess fondant with my palette knife. This step going pretty quick.


Next I removed the lace insert piece and clean up my edges while it is still in the mold cavity.  Once cleaned up you may wish to back it with the insert one more time and apply gentle pressure.


Then flip the mold over and gently begin to roll back the mold off the fondant lace piece.  I held the fondant down with the one hand will removing the mold with the other.


You may then use the palette knife to do any additional clean up you need.  With this piece I didn't need much.

Of course before placing on your cake you must play with the lace a bit and make fun designs.  


I used a just a swipe of water to attach the lace to my cake.  Here are a few close ups of the lace designs.

Using the Italian Lace Floral mold and the light purple fondant I created the lace design down the middle of the corset.

Full lace piece

Showing sections that I cut apart.

Then I turned the cut sections and over lapped them on the cake.


DTC Products Used:


Thursday, March 29, 2012

Bridal Motif Lace

A special thanks to Renea Feagin for the latest blog posting. Learn some tricks to using one of our lace molds! 

Lace Press Tutorial


By Renea Feagin, Baked Expressions


Tools needed:  fondant/gumpaste mix, DTC Lace Press mold, fondant roller


1.        Roll out fondant/gumpaste to about 1/8” thick or down to a 2 or 3, using a pasta machine. 


2.       Lay the fondant/gumpaste over the mold.


3.       Position the silicone lace over the mold, matching up the pattern.  Press into place.


4.       Continue pressing the silicone lace into the mold, using a small fondant roller.


5.       Gently, start peeling away or removing the excess fondant/gumpaste from the mold.


6.       Once excess removed, it should look like this. 


7.       If there is a little fondant/gumpaste sticking over the outline of the mold, just push it back in the mold so that there is no fondant/gumpaste over the outline.  This will prevent you from having to trim the finished lace.


8.       Flip the mold over and bend it at the end or corner and allow the lace appliqué to fall out and release from the mold.


a.       At this point, you can use the mold as one piece or cut out desired portions of the lace appliqué


9.       Brush the back of the mold with water.  Do not over apply the water.  The appliqué should be “tacky” to the touch but not too wet.


10.   Place the lace piece on an iced cake and decorate as desired.


Finished Product!


Visit Renea's Facebook Page to check out more of her wonderful designs.  Baked Expressions

Products Used:
Bridal Motif Lace Mold

Wednesday, January 11, 2012

Lace it up!

A special thanks to Sherrie Ortiz for the latest blog posting.  Get some great ideas on using some of the favorite lace molds.

Posted by: Sherrie Ortiz.
Owner Sherrie's Cake Magic.com


 This is the mold I picked to work into a draped lace border.  DTC Lace 2 Border-wide floral. I've really become a fan of Glenda's mold. They are so soft and easy to handle. I have some that I have made myself, they just don't compare to hers.


 Close up of this lace.
This is a nice size mold. It is long enough to cover a good distance without being difficult to manage.

You can see here where I added a small roll of fondant under the lace. I felt like it needed a bit of something to hold the lace away from the cake so I could get a batter draped look.
 

_________________________________________________
Roll out the fondant fairly thin. I used a Kitchen aid roller down to a 2. You want it thin enough to look like fabric. If it is thick it just won't look nice.  Lay the fondant into the mold, lay the top part of the mold on top of that.....  and trim the edges. Remove the top part and gently roll the edges with your finger towards the inside to clean the edges. Remove from mold.


Looks like this.
Flip over and paint with water. Remember less is more.


 Attach the lace with water pinching the top edge to get the folds. This is not hard. Just go for it. If you really mess it up take it off and do again. The biggest hint I can give is not to use too much water. It should only be tacky.... not wet.


For the next section place upside down on the table... wet a bit then fold in the right side just a 1/4 inch. This will remove the "raw" edge. When you pick it up that fold will be on the left. Attach it to the last section with water and drap them to look seamless.


Next the bottom edge needs a bit of help keeping it "fluffed" I used the paint brush and water under the edge to make it stick to the borad where I wanted it to stick.


TA DA!! Here is the finished cake. In hind sight I could have used this same lace mold for the swags on the 3rd tier down. It would have matched nicely. I used a texture pin. I could have also made a big bow out of this mold. The Lace on the second tier up is also from DTC... lace #1 Floral V spray. I really like that one too.   Yes the flowers are sugar. I made those.

I hope you enjoyed my blog.
You can see more of my work at www.sherriescakemagic.com

Products Used:
Lace Border - Wide Floral
Lace Floral V Spray

Friday, September 2, 2011

New Applique Lace Molds

The next project is a wonderfully detailed tutorial by Sherrie Ortiz showing some of the new lace molds -- Thank you SO MUCH Sherrie for this project!  

I started out with this 4 tier cake blank because I was redoing my dummies.


These are the molds I was using. There are 3 shown but I just used the two with the same pattern in the end.


First step is the design process. Deciding what goes where. The flexible molds are nice for this because you can fold them to into the areas to see just how it would look. As you can see I was undecided. It’s all part of the process.


HOW to use the molds: 


I really liked these molds. They are very easy to use. Gum paste or fondant is fine depending on what you want to do with them. I think they would make pretty cupcake toppers too. I first marked them with a sharpie to show where the patterns match up. 


This makes the process much easier.

Next roll out the fondant fairly thin but not so much you can see through it. Too thin and the lace will tear when you pick it up. #1 on a Kitchen aid roller if you have one. 


Place the fondant on top of the lace base (the bigger part) and then press with your hand enough to see some of the impression.


Now add the TOP of the mold matching the marker spots and press firmly till you see the edges of the fondant “break away”


Pull the fondant all the way off and take the TOP of the mold off. Use your finger to push any excess or rough edges into the mold. If you have a tear you could try to patch it at this time if you want.


 If you need a lot of these you can store them under a plastic flap so you can stream line your work. If they need to sit for a longer amount of time I will lay a damp towel OVER the PLASTIC to help hold in moisture.  I actually cut out all these parts and had dinner before I came back to finish the cake. I have done this as much as 24 hours ahead of time. Still just as fresh.


So I was mixing up different ideas for placement and nothing was working for me. I was thinking about piping something below the lace or add accents of something but I was not really in the right frame of mind. So I scratched that idea and went a totally different direction with swags. Here is a tip if you have a hard time visualizing where a  swag should go. I use red floss and pins to hang the string so I can see better.


 Bad idea. Just not right.
So getting to the point. I used a simple texture pin on the fondant that was rolled out to a 1 on the kitchen aid (not too thin) then I used the lace parts to accent the corners as shown.


I did use little balls of fondant to bump up the molds if the placement seemed too flat.


I finished it off with ribbon that had the same impression on it as the drapes and fondant pearls.


TaDAAAA!!!!!! Thanks for watching. Hope you enjoyed the show.

~~~~~~~~~~~~~~~~~~~~~~~~~~~~~~~~~~~~~~~~~~~~~~~~~

To see more work by Sherrie check out her website:  Sherrie's Cake Magic

Lace Molds Used: