-->
I figured, why not bake cookies… since silicone molds can stand more than 350F?
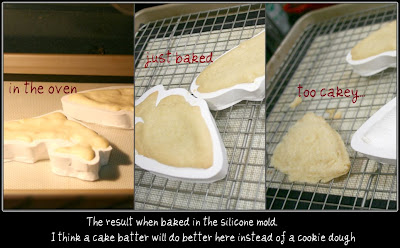
I thought of making my life easy by using a store bought cookie dough. Kneaded and simply pressed the dough into the mold and popped in the oven. But it turned out the store bought dough was a bit too cakey. It is fine to bake cookies in the silicone mold but the nature of the baked dough makes it difficult to release out of the mold, it breaks and the texture was just rough...
(but it didn't go to the trash, a little cookie monster gobbled the reject!)
***My thoughts : It might be more successful to bake brownies or blondies or use a whoopie pie or cupcake recipes when baking in silicone molds than a cookie dough....
So I got back to my baking station, this time I will not bake the dough in the mold but use the mold to shape the dough. From what's left with my store bought cookie dough, I added a bit more flour and I kneaded the dough just right and floured the mold. Considering the lessons learned from previous bake, I pressed the dough into the mold , not too filled and approximating the thickness to be 1/8 inch. I released the dough off the mold and let it stand for 10-15 minutes before baking. Placed it in a 350F oven for 12 minutes and it was just a perfect little crappie cookie!!!
Then I did the trout..a bit tricky on the fins and tail side , and if it breaks, just stick it to where it should be in the trout's body... no worries, as it is just going to mend itself well with the rest of the cookie when it rises a bit when baking.
A freshly baked cookie is very fragile. Wait for 3-5 minutes before taking it off the cookie sheet. Then transfer it to a cooling rack.Make a glace and brush over the cookies, just brush once. Let the glace set. The glace will be your canvass so it will be easy to paint on with the food color, petal or luster dust.
Use vodka or lemon extract to help dissolve the food /petal or luster powder (love the luster powder on the fishes..realistic!!!). Now its time to use your painting skills. Use blending techniques. Use different size brushes and preferably soft bristles. It is best to get a reference picture while you paint so it will come up real.
Crappies & Trout Cookies....a sweet catch of the day...
so good with a freshly brewed cup of coffee!!!
BTW, I did have a couple of broken cookies…
Enjoy Decorating!
Joanne Wieneke
www.thelittlecakepatch.com


OH -- These are EXCELLENT! I was thinking about using some of my molds to bake cookies in this week as well! How fortuitous that you experimented for me! I will try the molding, unmolding and THEN baking method. These are so perfect...that they totally gross me out!
ReplyDeleteThose are awesome - what a great idea!
ReplyDeleteThese are incredible! Where did you get the silicone fish molds from? Also, what is the recipe for glace? Thank you for sharing these beautiful fish cookies with us.
ReplyDeleteSOOO COOL!!! Excellent! May i know what glace you use?
ReplyDeletewow, these are amazing!
ReplyDeleteWow! I didn't expect that's possible. Great job! At first I thought this is a blog about cooking fish, to my surprise those are actually cookies!
ReplyDeleteThanks for the wonderful comments..
ReplyDelete**I love to hear that this could actually gross you out..LOL..
**The molds were from DTC's "Outdoor" line of Silicone mold.
**The Glace is : 3-4 Tbsp water and 2 cups confectioners sugar, mix until sugar is dissolved and heat it in the microwave for approximately 30 seconds (this is to make the sugar clear and not opaque).
I'm trying these and I just can't seem to get the cookie consistency right. The scales aren't really showing up. Also when you said you let them set for 15-20 min was that at room temp or in the fridge? Any suggestions would be greatly appreciated!!
ReplyDelete