Tuesday, September 12, 2017

To the Moon and back....

This new texture mat will help create a cake that is out of this world!


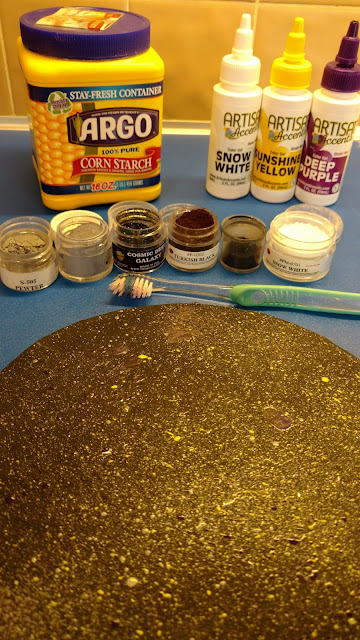
Select your colors for the background.  I used Artisan Accents gel colors Deep Purple and Sunshine Yellow and added a drop of the snow white to each, otherwise they did not show up on the black.  Trust me on that or you can run your own test.

There are also a variety of grey, black and white petal dusts to use on the cake.  The cornstarch and show white dust let me get additional shades of grey.  And one highlighter dust that I sprinkled onto the board for some shine.


Cover your cake board is a black fondant.  In small dishes place a few drops of the yellow and purple adding one drop of white to each.  Then thin down with a few drops of water.


Dip a toothbrush (one that has not been used in your mouth, please) into the colors and flick the brush to splatter the colors around.


For the cake I used a grey fondant, rolling it on top of the texture mat.  When done rolling pick the mat up and flip it over onto the table.  Then slowly peel the mat off the mat.


Drape the fondant over your cake and trim the excess.  Using the dusts help to create the shadows.  Mix the show white color with some water and use it to paint on some highlights.


Using a small sponge blend in the highlights.


DTC Products Used:
Crater Texture Mat

Tuesday, August 29, 2017

DECOgel Orbs


Check out our new half orb mold done in DECOgel by Icing Images!

The only colors I had on hand were red, purple and clear.  So, the yellow, orange, green and blue were done using AmeriColor gel colors with the clear DECOgel.


It was pretty easy to pour the DECOgel into the cavities and then use a palette knife to swipe off any excess.  Once set I just swipe my finger along the top and out pop the orbs.  


They really catch the light nicely! 

DTC Products Used:


Tuesday, August 1, 2017

Blooming Buttons


Start by using green sugarpaste in the floral stems mold.  Don't worry about getting the color just right you can dust after.


Apply the stems to the side of the cake and trim as needed.

Create the flowers using the Lace Flower Cutter set by Orchard Products. Dry the flowers over a dome of choice. I used Metal Bath Bomb Molds purchased on Amazon.


Layer the flowers and use button molds of choice for the flower centers.


DTC Products Used:
Floral2 - Floral Stems
Button - Small Set of 11


Tuesday, July 18, 2017

Are you ready to be Frosty?


Maybe thinking some frosty thoughts will cool us off from these soaring temperatures!


The supplies I used. The Lindt Lindor truffles and Ferrara Chocolate Orange (or other flavor) make perfect centers for snowballs and the top of the snowman hat while providing a yummy surprise.

Using the pearls texture mat to texture fondant to cover the cakes, board and chocolate.


Lift mold off fondant to avoid distortion.


Cover items and form around the balls.  Save scraps to fill in gaps on the larger items to cover.

If needed, cut around and piece them as you go.
Cover it all in a light dusting of super pearl. I used super pearl from The Sugar Art. 

Use the knit mat for a scarf and hat!

For the scarf, I cut and pieced together red and white for the pattern. 


Following the steps from the Let's Get Corny blog make a short corn cob pipe.  I thinned down some brown airbrush color to paint the pipe, then wiped it off so it stayed in the crevices.  Paint the center of the pipe dark.  Use Sugar Gypsy's border 4 mold to make the coal eyes and mouth.  Then mold a simple cone of orange, cut some lines on it and you have a nose!


Add a few buttons down his belly.


The cake board. Adding the super pearl really adds to the design.


DTC Products Used:
Texture Mat Lg - Knit
Texture Mat Lg - Pearls
Texture Mat Lg2 - Corn


Sugar Gypsy Border 4