Showing posts with label koi. Show all posts

Monday, June 9, 2014

Creating an Isomalt Pond


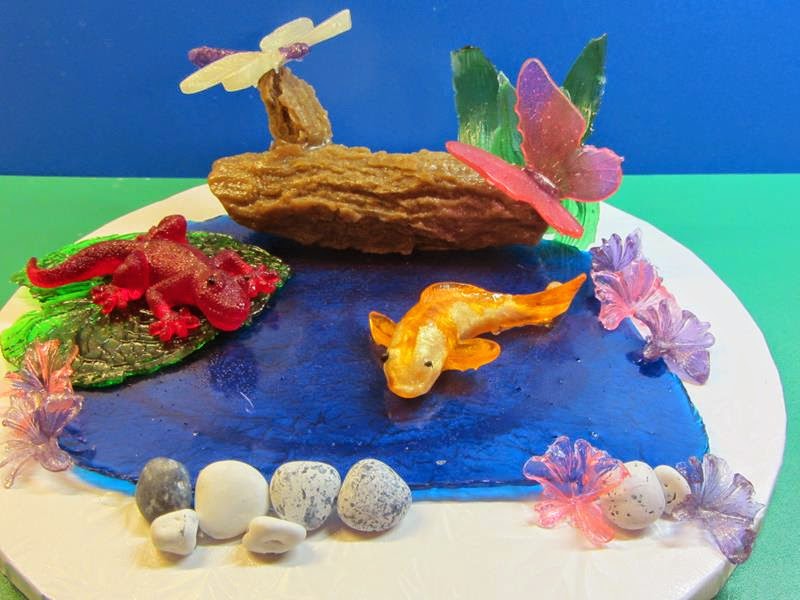
Today we will make the base pond and add the elements created in previous blog posts to get a great little pond scene.  

First use some aluminum foil, you will want to use a non-stick foil or if you do not have a non-stick foil use foil that you spray with cooking spray and then lightly wipe the excess off leaving a thin layer of spray.  

Wrinkle the foil up a bit, then smooth it back out.  The wrinkles add additional dimension to the back side of the isomalt.  Next manipulate the foil to build a dam to keep the isomalt contained when pouring out the pond.  Place the foil onto a silpat to help protect your workspace.


I used CakePlay Blue Isomalt Nibs, but you could use clear and add blue food coloring.  Place the nibs in a microwave safe container with a pour spout to melt, warming in 15-30 second increments until fully melted.  Stir with a bamboo skewer and let sit to allow bubbles to dissipate.  Then pour the isomalt onto your prepared foil.  Maybe you can aim better than I do and actually keep it all in the dam.  


You don't have to fill the entire area -- this is just a guide.


Once the isomalt is fully cooled gently pull the foil away from your pond.  


Invert onto a silpat and peel back the foil.


Place the pond the cake board or a cake top.  Using isomalt as your glue start adding in all of the elements created from out previous blog posts.

Dragonfly Directions
5 Petal Flower Directions

 Butterfly Directions


Log Directions


DTC Products Used:

Tuesday, May 13, 2014

Beautiful Marbled Koi Fish


To create this cute koi fish we used CakePlay isomalt nibs in orange,pearl and a black.  Start with the orange and pearl, melt the two colors in separate cups in the microwave.  Start in 15 second increments stopping to check the progress and stir with a bamboo skewer.  After the isomalt is removed from the microwave, give a few quick stirs.  If the isomalt was boiling wait until it cools a bit before continuing.  You want the isomalt to flow well but not be so hot the two colors blend into one solid color.

Drizzle in the orange isomal in random spots through the mold.  It should flow well but not immediately all pool to the bottom. See the drop staying in place on the edge as well as the parts on the "fins"?  If it is too hot they flatten more and flow to the bottom.


Then alternately pour in some of the pearl,. in random locations.  Repeat back and forth with the pearl and orange until the mold cavity is full.  


Set the mold aside to completely cool.  I use the end of a skewer to test the isomalt, if it dents it is still too warm.

Invert the mold and remove the koi fish.  

In a small cup meld a few black nibs then using the end of a bamboo skewer, dip the skewer into the isomalt to get a small amount.  If the isomalt is too hot at this point it will drip right off the skewer.  Once it has set a bit, use the skewer to dot a small amount of black onto the eye area of the koi.   


DTC Products Used:
Koi Fish

CakePlay Products Used:
Orange Isomalt Nibs
Pearl Isomalt Nibs
Black Isomalt Nibs

Saturday, November 26, 2011

Homemade Crayons


I have been wondering what else we could use the molds to make.  How about some crayons!


First get all of your supplies collected.

  1. Crayons - I ran out on Black Friday and got a great deal on the 96 Crayola pack.  You don't need to buy new crayons - this is a great opportunity to recycle the broken nubbins in the bottom of your craft box. 
  2. Molds of your choice
  3. Knife 


Peel all of the paper off the crayons.  Then chop them into smaller pieces.  You can play with different size pieces to get different patterns in the finished crayon.  Pile up the crayons in the mold.  For the seahorse it took 3 whole crayons.  The koi fish took about 6 crayons.


Preheat the oven to 150 degrees.  Place the molds in the oven for 15-20 minutes until the crayons melt.  After partially melted I added a few extra bits to make sure the mold was full when done.


When I removed the molds from the oven I used the back edge of the knife to slide the melted crayon from the edged into the cavity and clean it up a bit.


Let the crayons rest a bit until cool.  If you are a tad impatient you can pop them in the fridge to help them cool.


Once cool, gently pull the sides of the mold away from your new crayon to remove from the mold.


And there you have it!  Some great new crayons for the kids.


A couple close ups of the colorful creations.


 Used the metallic crayons for the seahorse.  Can you see the sparkles?


Close up of the seahorse face.  Very cute and I love the colors!


Added a sand dollar at the last minute.  


Remember if you use the molds for non food items they are not considered food grade after.  Keep these molds separate from the ones you are going to use for food.  I place a black "X on the back so I remember.

Products Used:
Seahorse Mold
Koi Mold
Sand Dollar Mold


Friday, July 23, 2010

Fishy Fishy - Take Two

Glenda Stockwell created an asian themed cake using the koi fish mold.


I loved this mold the moment Melissa showed it to me!

To create the koi I used fondant mixed with tylose. I firmly pressed the fondant into the mold and smoothed over the back with the palm of my hand. The mold then went into the freezer for about 15-20 minutes -- one I forgot about and it was in for a good hour with no damage done. I then let the fish sit and dry for a few days - this step wasn't necessary but I was busy so they had to wait. I used the all-mighty google image search to look for koi coloring and then using everclear and petal dust I painted the designs on my koi. Then I used a pearl sheen airbrush color and lightly airbrushed each --- this didn't show up that great in the pics but I liked the look in person.

I marbled the fondant for the cake and board --didn't look as marbled on the cake as it was on the board. Then stenciled an asian symbol that should read "peace" according to the stencil manufacturer but according to my friend it is not peace and he's not sure what symbol it is. Bamboo looking fondant pieces form the border. The bamboo was dusted with browns and greens.

For the top of the cake I create a water lily looking flower. I didn't have cutters or veiner so I just kinda winged it.


I hope you enjoy using this mold and make sure to share your pics!

Glenda

Products Used:


Tuesday, July 20, 2010

Fishy Fishy


Check out the project that Leslie Schweitzer created using the koi fish mold as well as the 5-petal blossom veiner.


This is my test for the koi fish mold.
I first made one out of poured sugar, but thought it lacked the "weight" necessary on the top of a cake, so I went with fondant.
I took 2 colors of fondant (green and yellow) and braided them together, never fully incorporating the two colors.
Then I pressed the "tie-dyed" fondant into the mold, going over the flat top with a rolling pin to achieve definitive markings on the fish (scales, gills, etc.)
I popped the mold into the freezer for 20 minutes to ensure a solid fishy :o)
The cake is then covered in a sea blue fondant, and a ribbon made of the same fondant as the fish, details the bottom edge.
As I am always one for flash, I painted the entire cake in pearl luster dust to achieve a shiny, wet look.
Extra bling came from the blue, green and silver dragees for the eyes and decorating the ribbon border.
I (again) used my fantastic 2-piece flower veiner for some isomalt flower details around the koi, to give an underwater feel.

I hope you like this, fun to make!
Leslie S.
Products Used: