
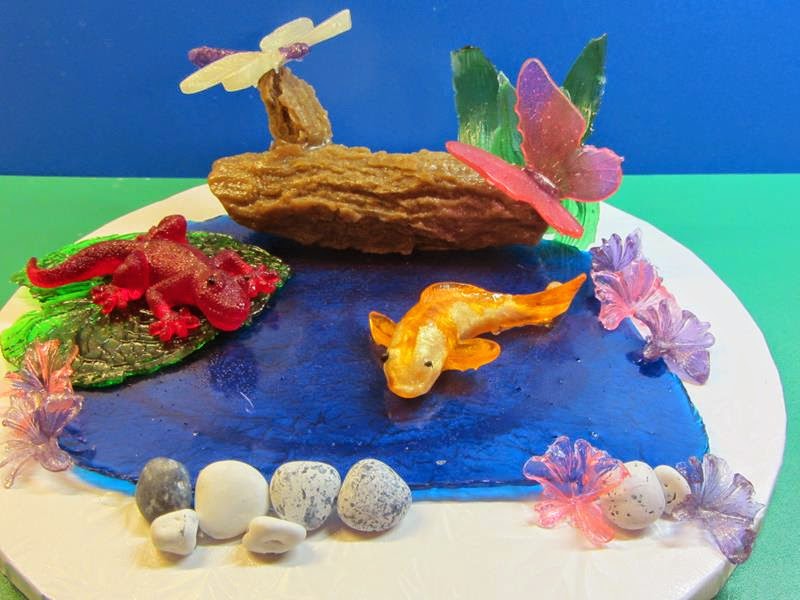
Today we will make the base pond and add the elements created in previous blog posts to get a great little pond scene.
First use some aluminum foil, you will want to use a non-stick foil or if you do not have a non-stick foil use foil that you spray with cooking spray and then lightly wipe the excess off leaving a thin layer of spray.
Wrinkle the foil up a bit, then smooth it back out. The wrinkles add additional dimension to the back side of the isomalt. Next manipulate the foil to build a dam to keep the isomalt contained when pouring out the pond. Place the foil onto a silpat to help protect your workspace.

I used CakePlay Blue Isomalt Nibs, but you could use clear and add blue food coloring. Place the nibs in a microwave safe container with a pour spout to melt, warming in 15-30 second increments until fully melted. Stir with a bamboo skewer and let sit to allow bubbles to dissipate. Then pour the isomalt onto your prepared foil. Maybe you can aim better than I do and actually keep it all in the dam.

You don't have to fill the entire area -- this is just a guide.

Once the isomalt is fully cooled gently pull the foil away from your pond.

Invert onto a silpat and peel back the foil.

Place the pond the cake board or a cake top. Using isomalt as your glue start adding in all of the elements created from out previous blog posts.
Dragonfly Directions


Log Directions


DTC Products Used:
Koi Fish
Dragonfly
5 Petal Blossom
DTC Alstoermia Leaf Veiner
Butterfly Regular Wings
Butterfly Monarch Wings
Pear Tree Bark
Gecko
Anthurium X-Large
Dragonfly
5 Petal Blossom
DTC Alstoermia Leaf Veiner
Butterfly Regular Wings
Butterfly Monarch Wings
Pear Tree Bark
Gecko
Anthurium X-Large


No comments:
Post a Comment